
Last Updated on June 13, 2018 by Heather Hart, ACSM EP, CSCS
In the running world, I often joke that strength training is akin to flossing your teeth: everyone knows that you need to do it, but not everyone takes the time out of their day to actually do it. Instead, you put it off time and time again, convincing yourself that brushing (running) is enough. Until one day your dentist says “Have you been regularly flossing?” and you sheepishly nod your head “no” while stammering out a few excuses. Now swap out the dental hygiene for core strength.
Sound familiar?
In my professional opinion, core strengthening exercise are some of the most important, yet most undervalued exercises in the running world. A strong core – which includes not just your abdominal muscles, but also your hips, glutes, and lower back – can not only help prevent injuries, but can make you a stronger, more efficient, faster runner that can run longer before experiencing fatigue. On the trail, core exercises will also help improve your balance, stability, and kinesthetic awareness.
And the best part? Core strengthening exercises do not have to be complicated, or take up a lot of your time. Hell, you don’t even need a gym, or any equipment to perform them
Now that we’ve taken away all of the excuses, here are 8 simple, no equipment required, core strengthening exercises that all trail runners (or any runner) – from beginners to elites – can benefit from.
Disclaimer: I am an ACSM certified Exercise Physiologist, and believe all of these exercises to be safe for most runners. However, this workout should not be taken as a personal prescription. Perform all exercises at your own risk. Please check with your physician before beginning any new exercise routine.
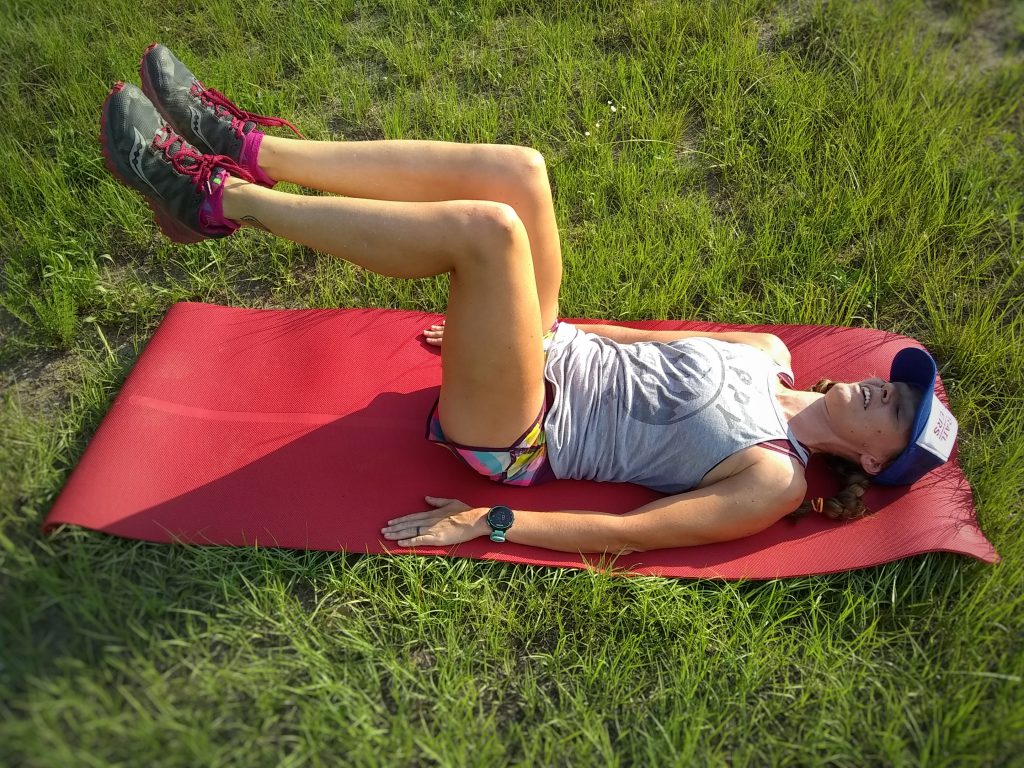
Deadbugs
In my opinion, this is one of the most important core exercises that anyone can do. A 5 minute plank or 500 crunches are utterly useless if you do not know how to properly engage your core. The deadbug not only teaches you how to properly engage your abdominal muscles, it also challenges the transverse abdominal muscle (the innermost layer), hip flexor strength, and challenges mobility as well as movement control. Added bonus, you’re also working the diaphragm, pelvic floor, and multifidus muscle. What’s not to love?
- Lay on your back, knees bent, feet flat on the floor/ground. Take your hand and reach towards your lower back while the core is relaxed. Feel for and recognize the space that naturally occurs between your low back and the ground.
- Now that you recognize that empty space: you are going to get rid of it. Take in a deep breath, then exhale and contract your abdominal muscles. Ever so slightly try to bring your hips towards your ribcage, without lifting your butt or hips off of the ground. If you are doing this correctly, your low back will sink towards the ground, removing that empty space. This is what it feels like to have your core properly engaged.
- Keeping your low back pushed into the ground and core engaged, bring your knees up to a 90 degree angle.
- Again, keeping the core engaged and low back pushed into the ground, extend one leg straight out, while keeping the opposite leg at a 90 degree angle. Simultaneously, extend the opposite arm out overhead, keeping the other arm down by your side. The further you extend your leg and the closer you bring it towards the ground (but don’t touch the ground!), the more difficult the exercise will be. If at any point your back arches off the ground, you have gone too far. Reset, and try again, perhaps keeping the foot closer to the body.
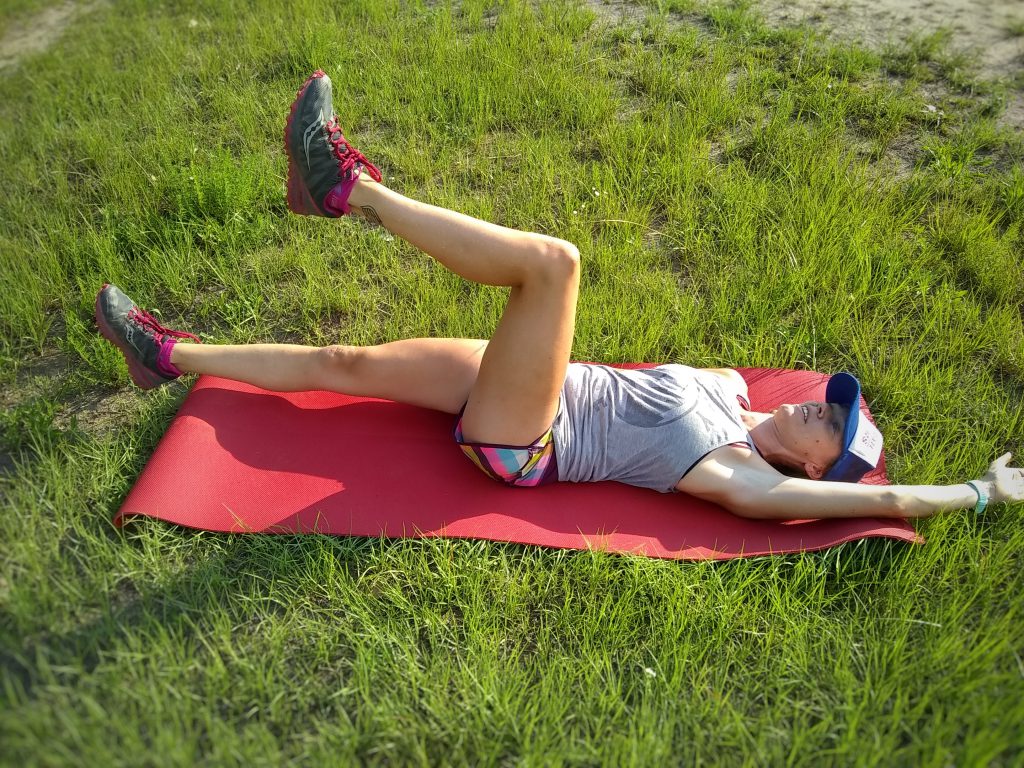
- Return arm and leg to start position, and repeat on the other side. Alternate legs for a total of ten repetitions on each side.
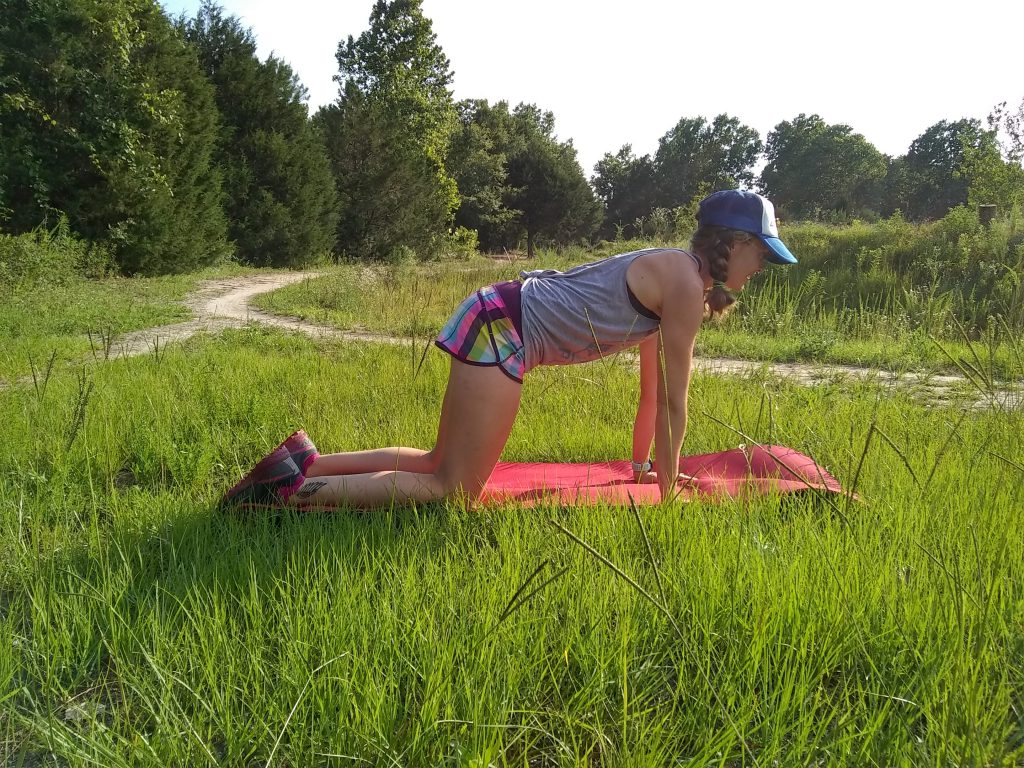
Bird Dog
Bird Dogs are a great exercise not only for abdominal strength, but for glute strength as well. They also challenge your balance and kinesthetic awareness, which is something trail runners can never get enough of.
-
- Start in tabletop position on your hands and knees. Hands should be shoulder width apart, directly under the shoulders. Knees should be about hip width apart, directly under the hips. Having a solid base will help you keep your balance throughout the exercise! Keep your back flat, neck and spine in a neutral position.
- Engage your core, then extend one arm straight out in front of you, while extending the opposite leg directly behind you. Aim to make your body as flat as a board. Focus on squeezing your abs, low back, glutes, and shoulders to keep your arms and legs from sinking towards the ground. Hold this pose for a count of 30-45 seconds, then return to center, and repeat on the other side.
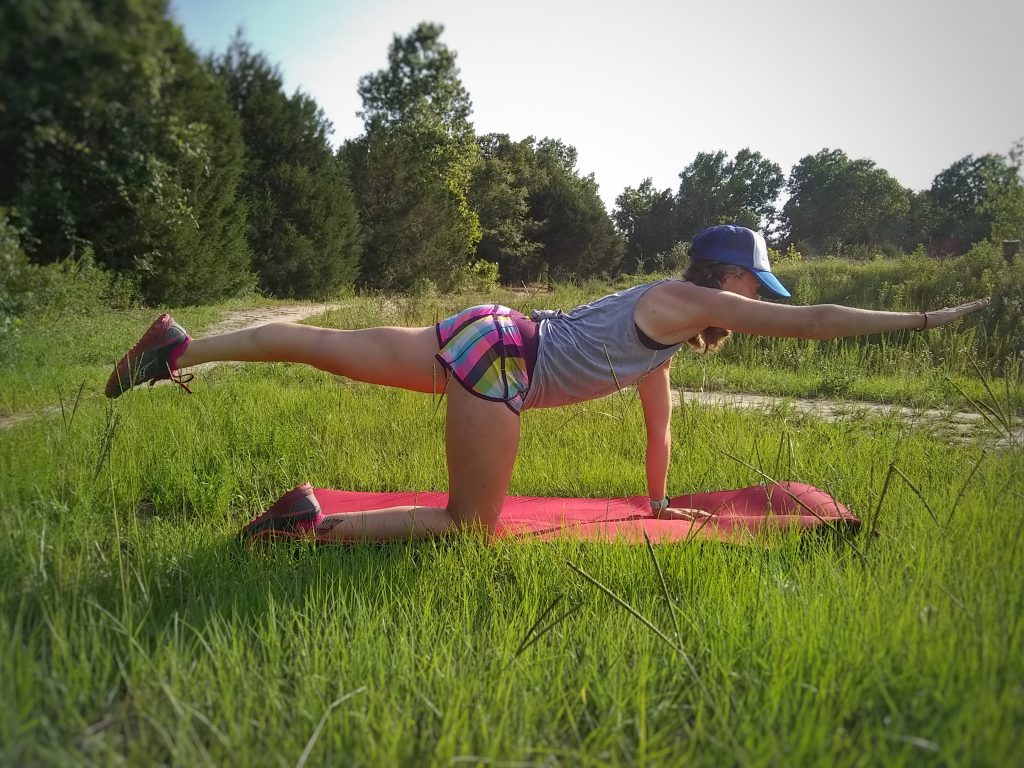
- VARIATIONS: Instead of holding the bird dog pose, extend for only 2-3 seconds, then return to center. Alternate legs for a total of 10 on each side. Another variation includes bringing your knee and elbow towards the center line, squeezing your core in a “crunch”.
- Start in tabletop position on your hands and knees. Hands should be shoulder width apart, directly under the shoulders. Knees should be about hip width apart, directly under the hips. Having a solid base will help you keep your balance throughout the exercise! Keep your back flat, neck and spine in a neutral position.
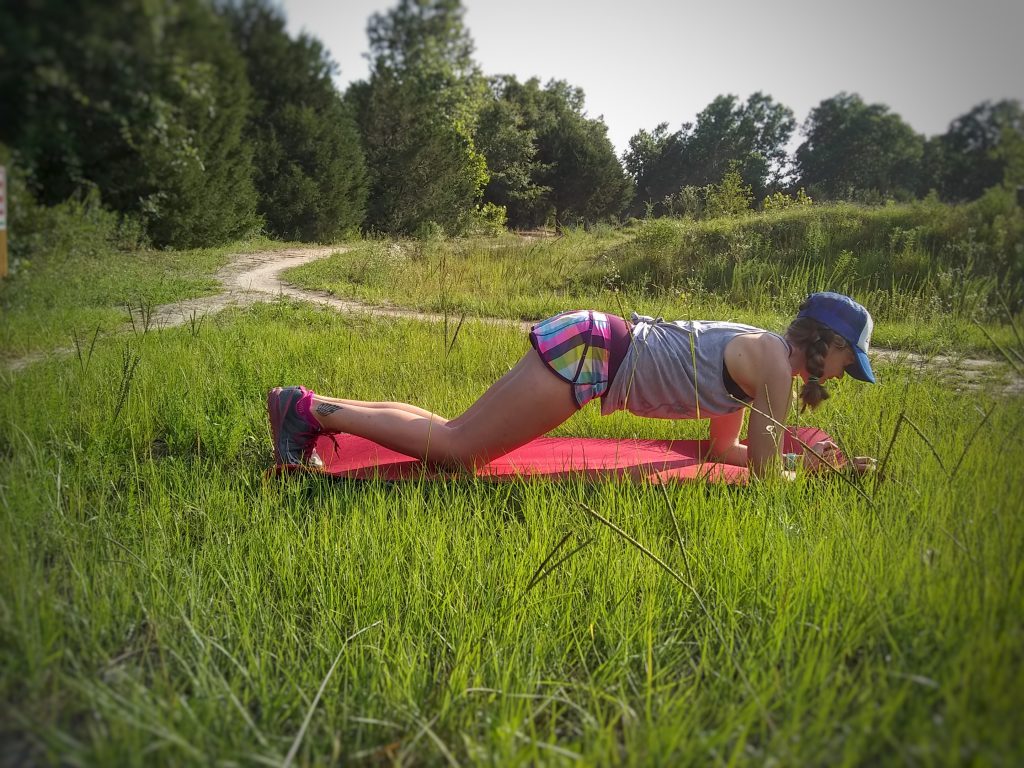
Knee Tap Planks
I love this variation of a plank because it not only challenges your abdominal muscles and lower back, it helps strengthen your hip flexors as well. Plus, the movement of this exercise versus a standard plank helps avoid that painful “how long do I have to hold this plank?” monotony.
- Start in a low plank position on your forearms. Try to keep your elbows directly under your shoulders, elbow bent at a 90 degree angle. Keep your back flat, aligning your entire body like a flat board, or a “plank”. Try to avoid sticking your butt in the air or allowing your hips to sink.
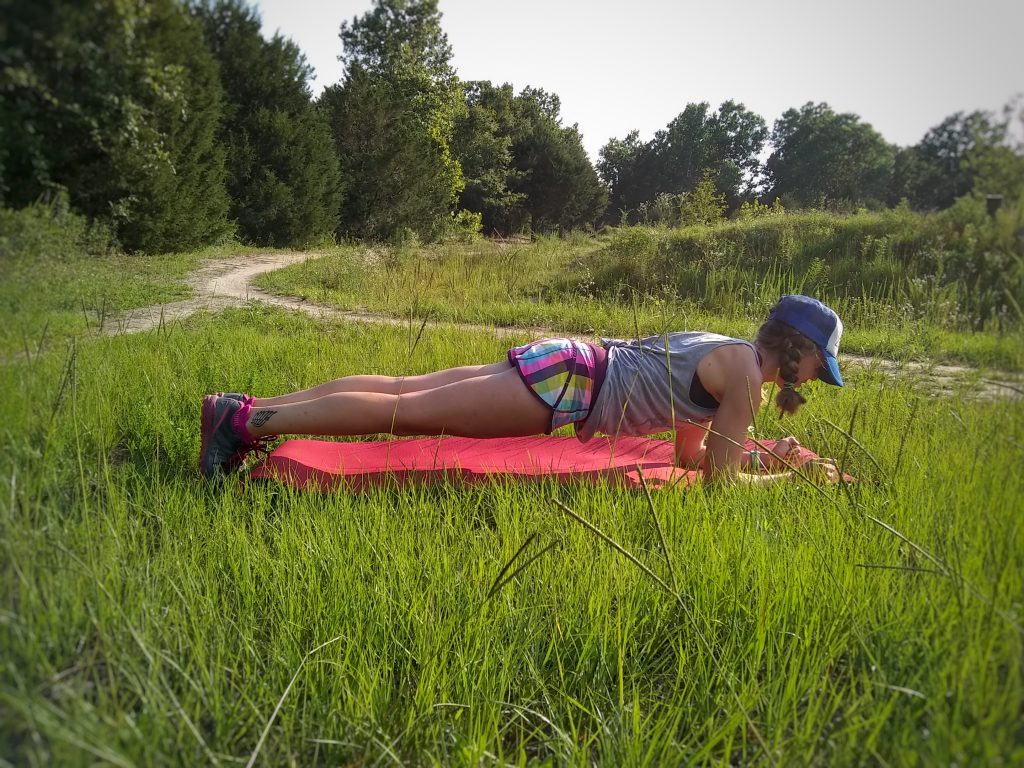
- Keeping your upper body and toes in plank position, slowly let your knees drop towards the ground. The second they touch the ground, quickly squeeze your glutes, quads, and hamstrings to “pop” back into plank position. This should be a smooth, yet speedy exercise. Do not spend a lot of time with your knees on the ground.
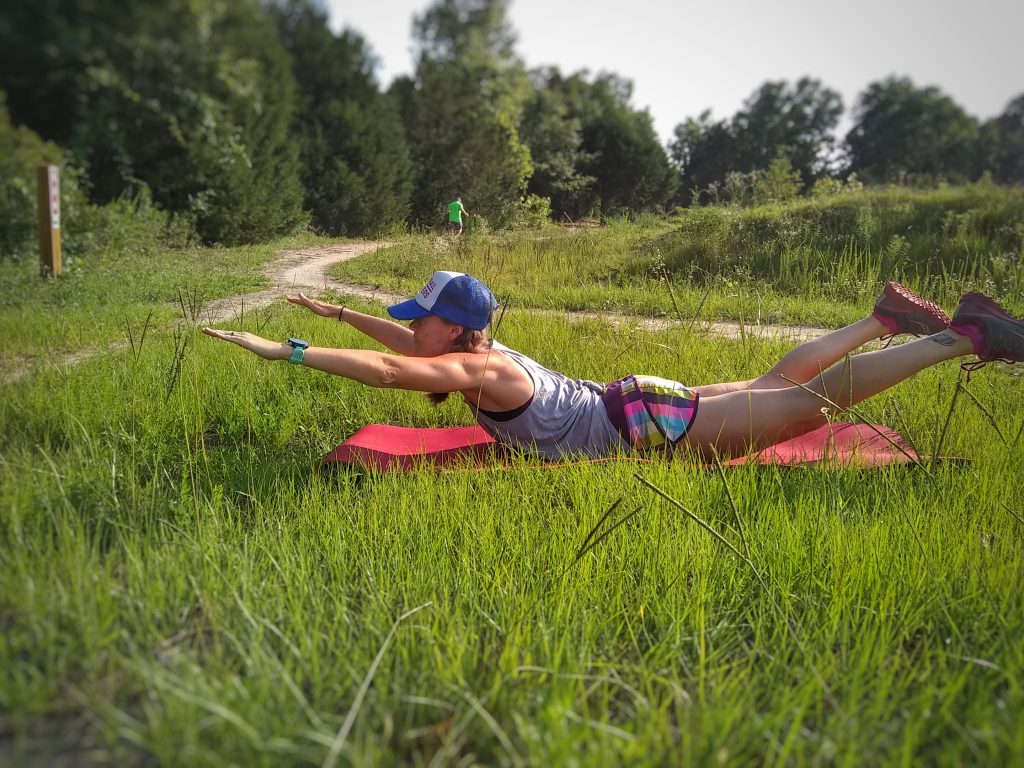
Superman
Ahhh, the low back. The core’s distant, often forgotten cousin. I see people slaving away at the gym on the abdominal machines, but give very little – if any – attention to the lower back. You see, each muscle group has an opposite muscle group that keeps it in check. The opposing muscle, or the antagonist, should never be ignored in strength training, as it helps in specific body movements. Having an imbalance in strength between an agonist/antagonist can actually lead to injury. And in the case of the abdominals, the antagonist muscle group is the erector spinae, a.k.a. the lower back. My favorite no equipment low back exercise? Superman!
- Lay down on the ground on your stomach. Legs extend behind you, arms extend out overhead. Though it feels uncomfortable on the ground, keep your face down, eyes focused on the ground in front of you. Try to keep your entire body in one straight line.
- Squeezing your lower back, glutes, and shoulders, try to lift your chest AND your quadriceps off the ground. Keep your legs straight, do not try to lift your legs by simply bending at the knees. Squeeze those legs to lift them off the ground. Hold for 2-3 seconds, then lower. Repeat ten times.
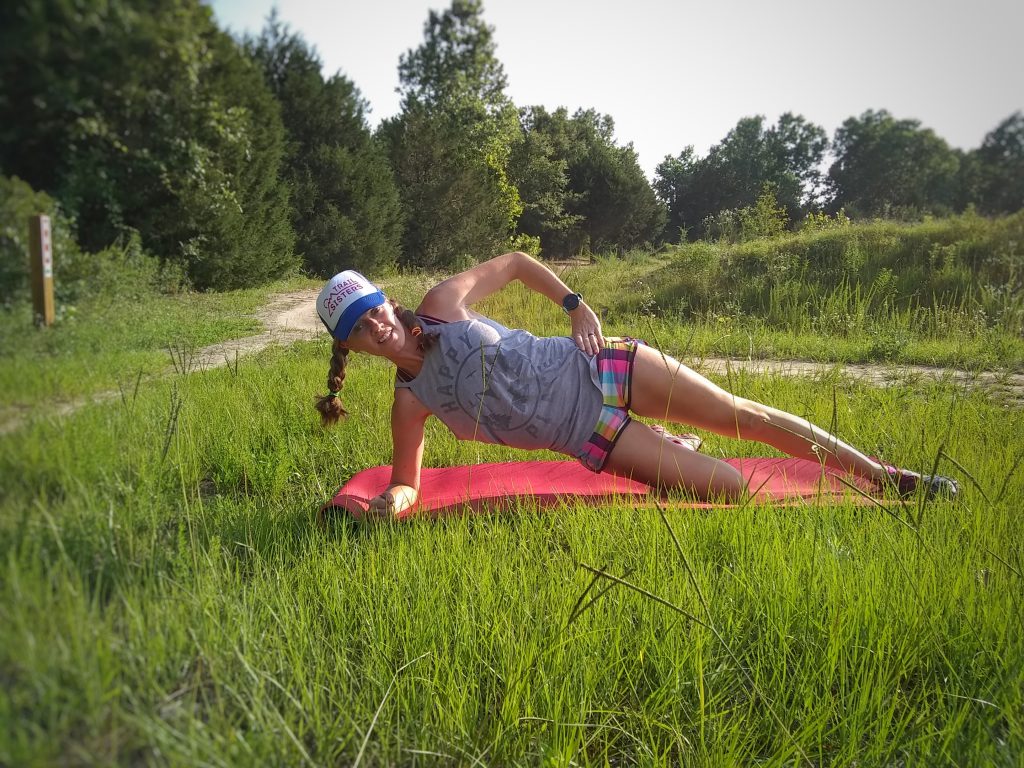
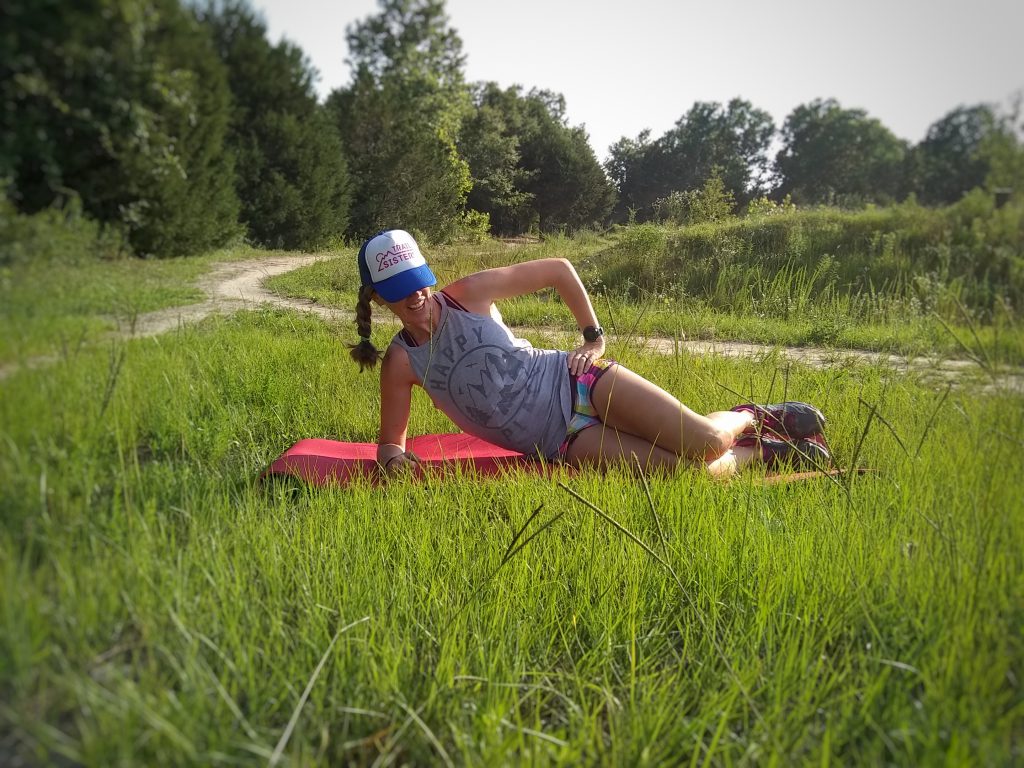
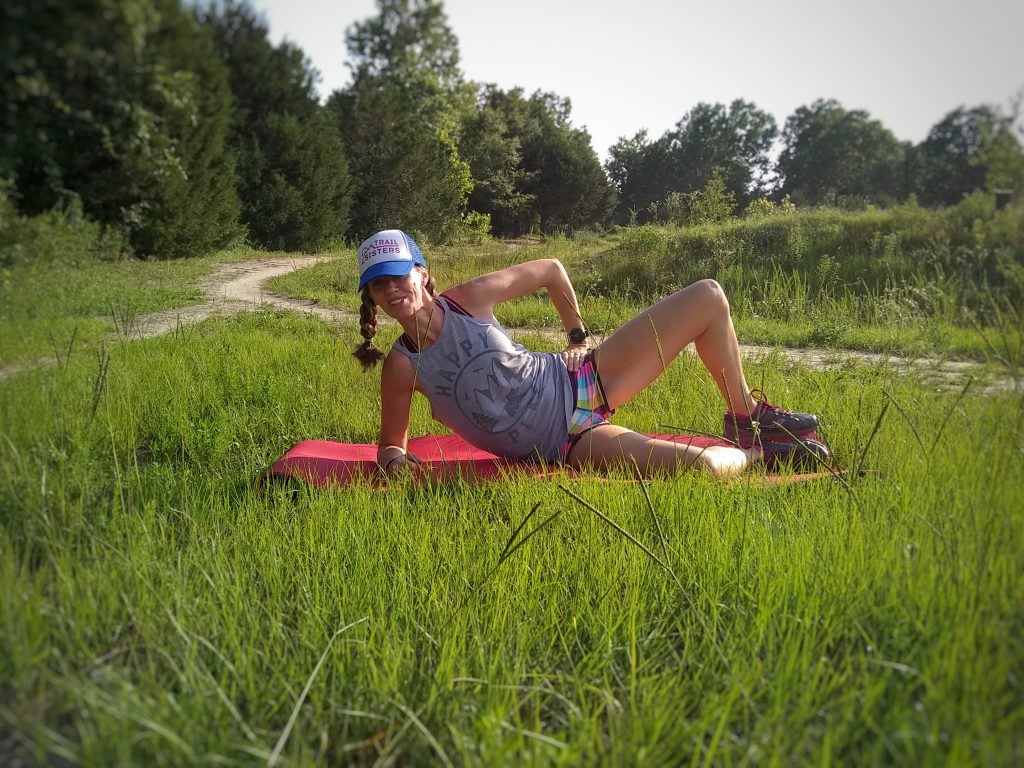
Side Plank Hip Dips
A fun variation on the side plank, great for the obliques and hips…as well as avoiding monotony (can you tell I don’t like staying still?).
- Lay on one side. Place your elbow on the ground directly under your shoulder to help support your body weight. Working your way down the length of your body, make sure you are completely perpendicular to the ground. Hips should be stacked one on top of the other, as should the thighs and lower legs.
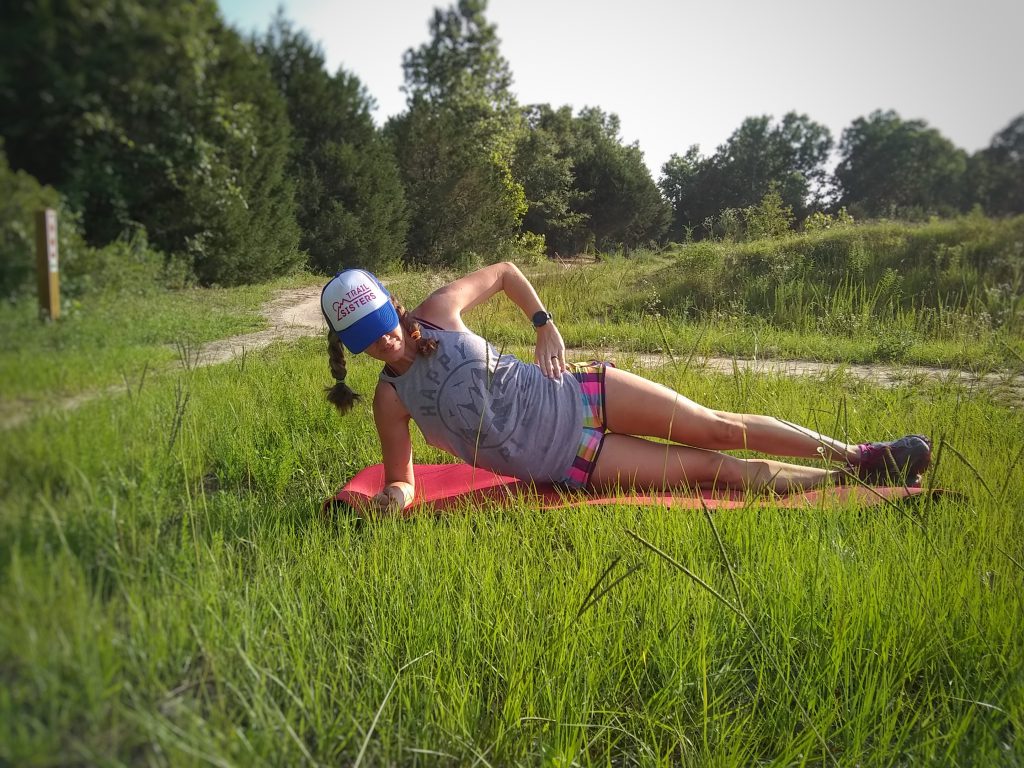
- From this position, pop your body weight up into side plank position. Then, slowly lower your body in a controlled fashion until your hip almost touches the ground. Before it does, pop back up into side plank. It’s common for your body to come slightly higher than standard side plank during this exercise. Try to keep movement slow and controlled. Also, try to initiate movement from the core, rather than pushing through the knees.
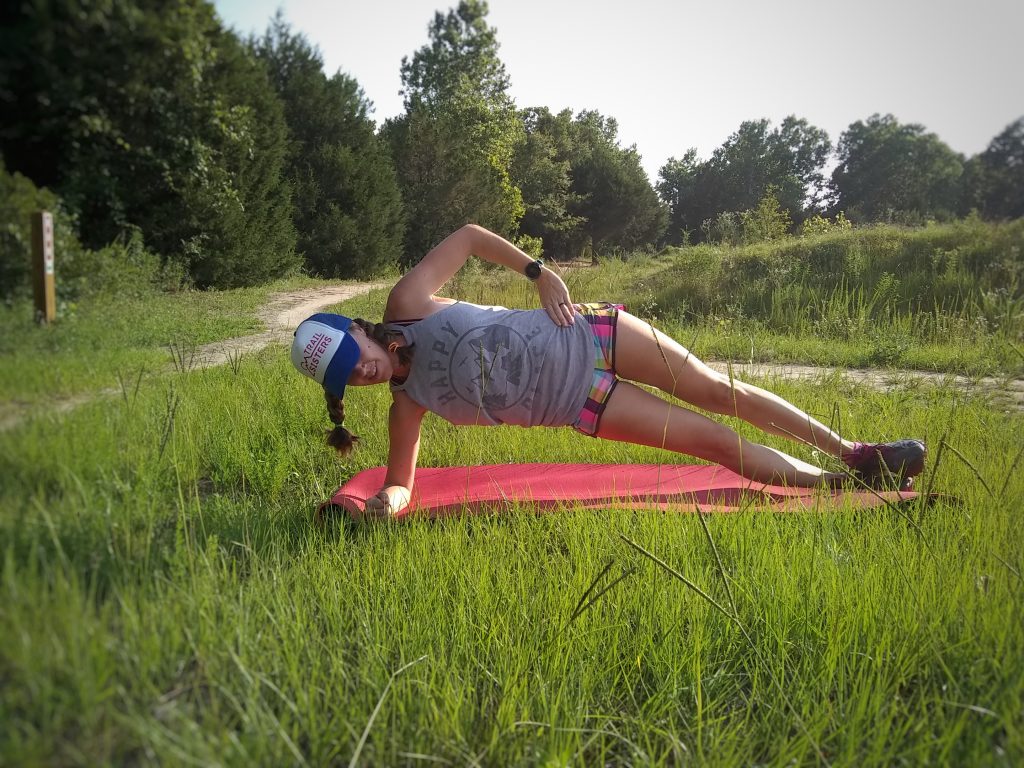
- Modification: If this exercise is too difficult, use this simple modification. In the start position, once legs are stacked one on top of the other, tuck the bottom knee behind you in a 90 degree angle. Continue with the exercise in the same fashion.
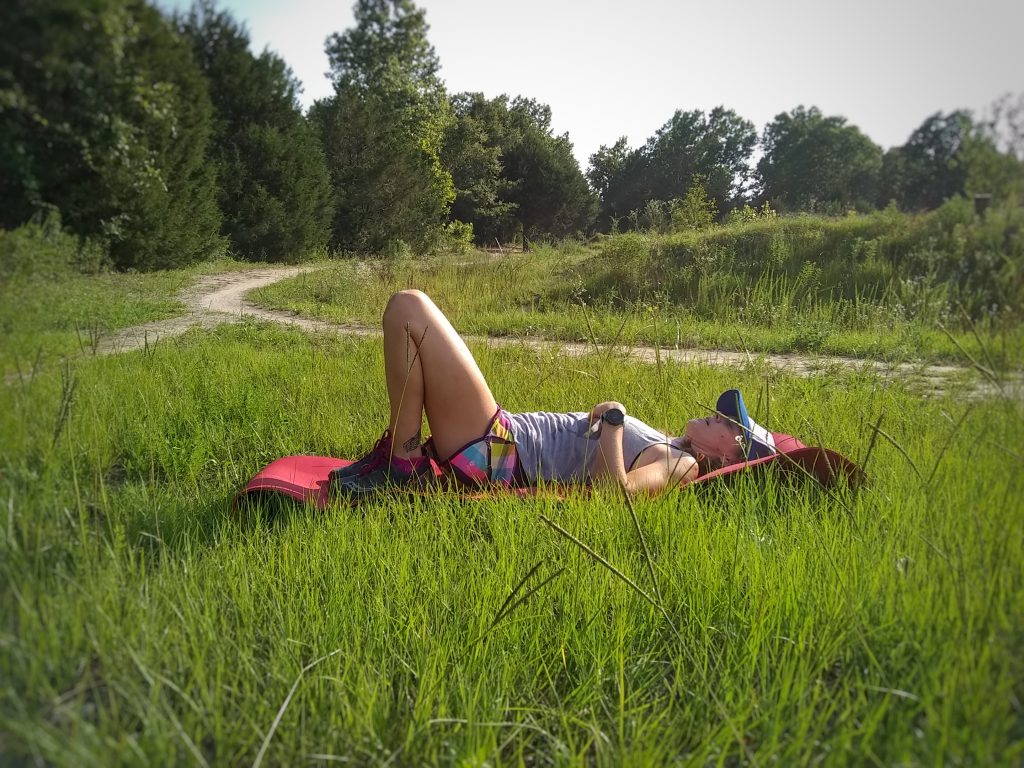
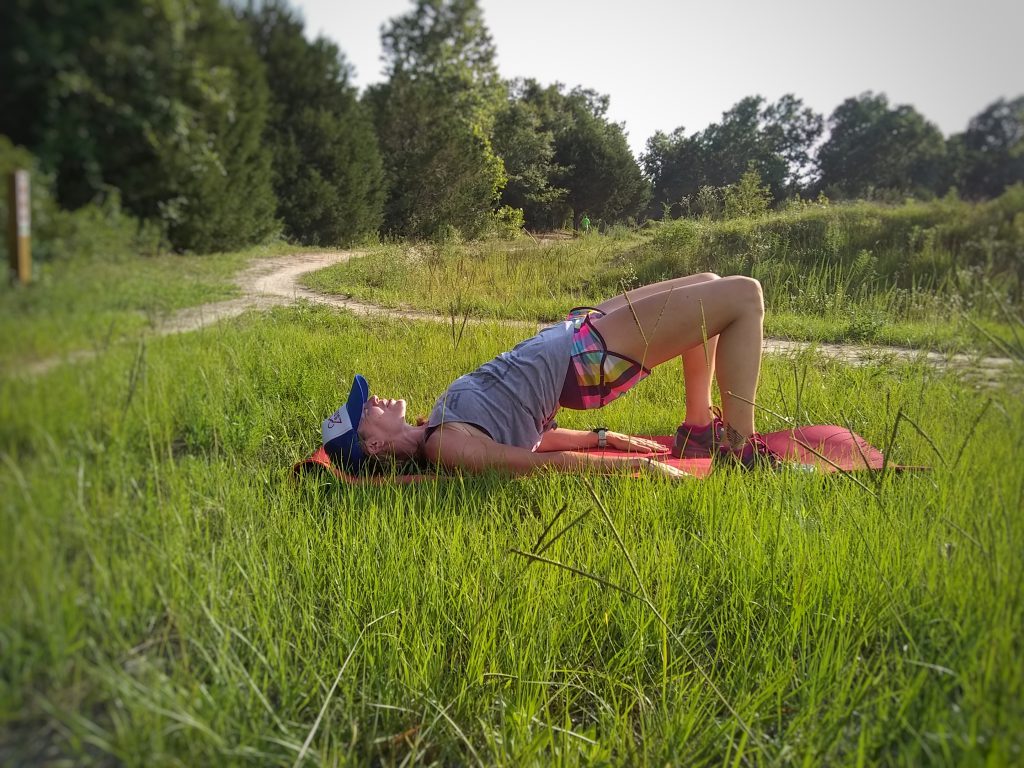
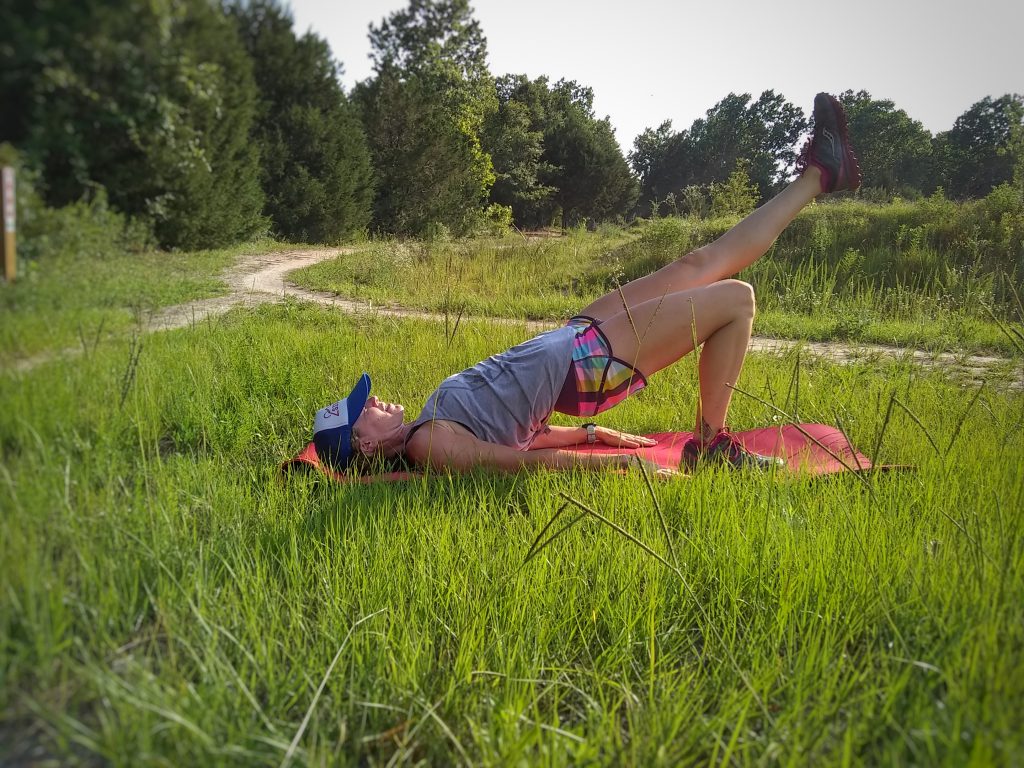
Glute Bridge
Bridges are great for glute and hip strength. But turning them into single leg glute bridges adds the benefit of lower leg stability and ankle strength!
- Lay down on your back. Bring your heels in close to the body, so they almost touch your fingertips.
- Pushing through your heels, lift your body off the ground by engaging your abdomen, glutes, and legs. Push all the way up until you are resting on your upper back. Imagine your body is in a “reverse plank”, you want your spine to be one long straight line, without hips sagging towards the ground. Hold this pose for 30-45 seconds.
- To turn this exercise into a more difficult, single leg bridge: extend one leg straight out so that your upper legs are parallel to each other. Slowly lift and lower your body off the ground, holding the top of the pose for 2-3 seconds before lowering. Really focus on keeping the hips high, while maintaining the extended leg’s position.
Clamshells
Clamshells are a hilariously awkward exercise that are fantastic for the hips and glutes (both gluteus medius and maximus). For bonus fun: perform this exercise with a friend, while facing each other, and try not to laugh. (Yes, I’m still six years old deep down.)
- Lie on your right side with your feet and hips stacked, your knees bent 90 degrees. You can either rest your head on your arm, lying down, or support yourself on your elbow. Draw your knees in toward your body until your feet are in line with your butt.
- Keeping your core engaged and your feet together, raise your left knee as far as you can without rotating your hip or lifting your right knee off the floor. Lift and lower slowly, with a 2-3 second hold at the top of the exercise.
Shout out to Trail Sisters for the awesome hat!
These are just a few examples of dozens and dozens of no equipment, core exercises that can be beneficial for runners. If you are new to core strengthening exercises, I recommend starting with 2-3 sets of 10 repetitions (or, 30 second holds) of each exercise. Repeat 3 times per week, and I almost guarantee that you’ll notice a difference in your running in no time!
Heather Hart is an ACSM certified Exercise Physiologist, NSCA Certified Strength and Conditioning Specialist (CSCS), UESCA certified Ultrarunning Coach, RRCA certified Running Coach, co-founder of Hart Strength and Endurance Coaching, and creator of this site, Relentless Forward Commotion. She is a mom of two teen boys, and has been running and racing distances of 5K to 100+ miles for over a decade. Heather has been writing and encouraging others to find a love for fitness and movement since 2009.
Liz Wilson
This is great! I’ve been working really hard lately on activating my core while I run. Can’t wait to work on these exercises!
Kayla
I love this! I’m 13 and I’ve ran three 25k trail races and one 13 mile race. This is so helpful! Thanks!
Holly Martin
This is awesome. You’ve shared some great and effective core strengthening exercises here. Have tried some of these and would love to include the rest of them. Many thanks!