Last Updated on January 11, 2023 by Heather Hart, ACSM EP, CSCS
You’re a runner. You love to run. You know you need to strength train, but you feel overwhelmed by all of the information and options out there. You’re not sure where to begin, what type of workout is best, or how to even fit strength training into your running.
Listen, I get it: the world of strength training can be wildly confusing and intimidating. And that’s why I’m here: to make strength training as accessible as possible for runners.
Hi, I’m Heather Hart. In addition to being an accomplished ultrarunner and long time running coach, I’m a certified Exercise Physiologist, a certified Strength and Conditioning Specialist, and I have a BS in Exercise Science.
I love strength training just as much as I love running, and I’m hoping I can help you learn to love it as well.
In this no-frills beginner strength training workout for runners, I’m going to give you an expert designed, uncomplicated, effective, full body strength training workout that you can incorporate into your training.
For more information on the science behind strength training, the benefits of strength training, and the many reasons why you should incorporate it into your training, please visit the following posts:
Strength Training for Trail and Ultra Runners: 11+ Pros, Cons, & Misconceptions Explained
Simplifying Strength Training for Ultrarunners: 7 Moves to Balance Lifting and Running
(Note: both of these posts are relevant even if you are a road runner/not a trail or ultra runner!)
Beginner Strength Training Workout for Runners FAQ’s:
First, we’ll talk about the equipment needed, FAQ’s, and explain how to put it all together with suggested sets, reps, and rest periods.
Then, we’ll cover the seven specific strength training exercises used in this workout, as well as detailed instructions on how to perform them.
Who is This Workout Designed For?
This strength training workout was designed for runners – from beginner runners to experienced distance runners, and everyone in between – who are looking to incorporate strength training into their life, but identify as “beginners” when it comes to regular strength training.
They want all of the amazing benefits of resistance training, such as improved running economy, injury prevention, delayed muscle fatigue while running, and increased muscular strength, but have no idea where to start.
Participants should be injury free or cleared by a physician to engage in strength training before beginning this workout.

Where Can I Do This Workout?
This workout can be done almost anywhere: a gym, a studio, outdoors, or the comfort of your own home.
Basically, anywhere that you can safely and comfortably move your body, and move around whatever sort of weight or resistance you have access to.
What Equipment Do I Need?
Ideally, this workout is performed with dumbbells of varying weights. But if you don’t have access to dumbbells, anything that you can safely hold that provides weight, or resistance (such as resistance bands), will work.
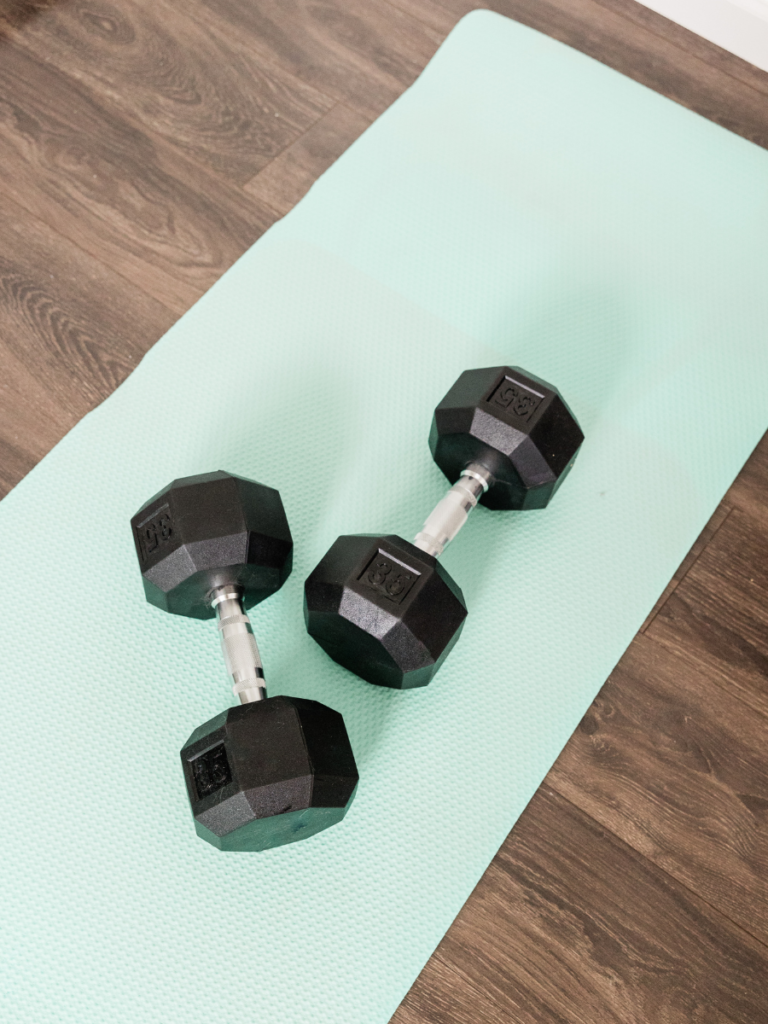
In order to build strength, your muscles must be overloaded under a stimulus greater than what they are currently adapted to. This is known as the Principle of Overload.
But, your body doesn’t know the difference between an 8 lb dumbbell or a full gallon jug of water (which happens to weigh 8.34 lbs). So do not stress about having the “perfect” equipment.
How Long Does this Workout Take?
When you first attempt this workout, it may take a little longer, as you become familiar with the exercises, as well as the sets/reps/rest pattern.
After a few sessions, you should be able to complete this workout in around 30-40 minutes, including your warm up.
This Looks Basic – Is This Workout Actually Effective?
YES, this plan will work. I cannot stress this enough. While this workout may not look flashy, it effectively targets all of the major muscle groups in your upper body, lower body, and core.
In my expert opinion, there are two reasons why the internet is FULL of complex and complicated strength training moves and workouts:
- Because they are written by well meaning individuals who have little to no education in exercise science or understanding of strength programming, and
- Because just like the latest diet or training gadget, people always want to believe there’s some sort of “magical” move or routine out there that will instantly get them in shape. The flashier, the better.
In reality, what’s been proven to work best is compound exercises / movement pattens combined with consistency and progressive overload. It doesn’t have to look fancy or complicated.

Shouldn’t I be Doing Running-Specific Moves?
Specificity certainly matters when it comes to sport performance, and running is no exception.
However, the biggest mistake I see among runners is that they spend far too much time focusing on “running specific” strength moves that essentially mimic the strength you’ve already built while running.
Meanwhile, other major muscle groups are neglected, creating an overall muscular imbalance and weaknesses.
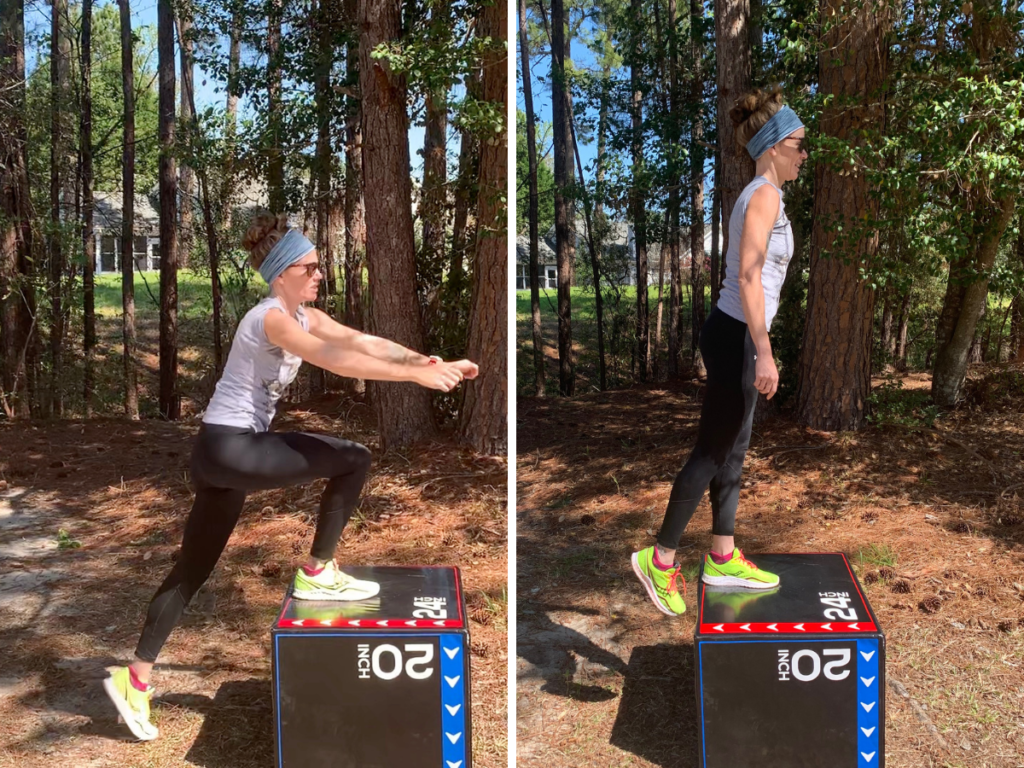
If you are brand new to strength training, and truly want to improve overall strength for not only running performance, but health benefits, these tried and true compound movements will give you the greatest benefits in the shortest amount of time.
Related post: Does the 3 Minute Mountain Legs Workout for Runners Work?
How Many Days Per Week Should Runners Strength Train?
Ideally, you should participate in strength training at a minimum of 2-3 days per week.
Do not let that number overwhelm you! Even adding one day a week of strength training to start will be beneficial. You can work up to 2-3 days over time.
Where Do I Fit Strength Training into my Running Plan?
The seemingly most confusing part about strength training for runners is understanding how to fit it into your already established running training plan.
The reality is, there are a number of ways to successfully do this, and a number of very individual factors to consider.

If you are running 3-4 days per week, I encourage you to add strength training to one or two of your days off, being sure to keep at least one day as full rest from training.
If you are running 5 or more days per week, you may find it beneficial to pair your strength training workouts on days with shorter, harder effort runs.
If you experience a lot of soreness or fatigue after weight training, you may want to avoid lifting the day prior to your long run.
Absolute Beginner Strength Training Workout – How To Guide:
Disclaimer:The following workout was designed for educational purposes, and is not a prescribed training plan for any particular individual. Understand that when participating in strength training exercises, there is the possibility of physical injury.
If you engage in this workout you agree that you do so at your own risk, are voluntarily participating in these activities, and assume all risk of injury to yourself. You should consult your physician or other health care professional before starting this or any other fitness program to determine if it is right for your needs.
If you are not comfortable performing a movement, ask a trained fitness professional for in person help!
WARMUP: Always begin with some sort of warmup in order to increase blood flow to the muscles and prepare your body for movement. Suggested warmup includes:
- Wall, bar, or incline pushups x 10 reps
- Sit-to-stands x 10 reps
- Bird Dogs (alternating) x 10 reps
- Shoulder I, Y, T’s x 10 reps each (unweighted or light weights, 2-5 lbs max).
Run through the list 2-3 times, focusing on form and full range of motion. Please feel free to add any mobility exercises you enjoy, or like to do before lifting.
LOAD AND REPS:
When you first begin, you want to aim for a weight or resistance that you can safely move for 8 to 12 repetitions (reps) with the last 3 to 5 reps feeling difficult or offering a nice muscular “burn” sensation, BUT, you are still able to lift with safe, and proper form (when in doubt, seek out a certified personal trainer or other qualified fitness professional).
When you first begin lifting weights, initial gains will be almost entirely neuromuscular.
This means your body is adapting to the movement patterns, and becoming more efficient at them. Yes, you will still improve muscular strength (as well as improve tendon and connective tissue strength).
But, during this phase you do not need to be as concerned with lifting very heavy weights, but rather, using and mastering correct form.
Each movement should be done slowly, but with a purpose. Avoid rapid movements and try to get full range of motion (ROM). If you are struggling with a particular movement, do not be afraid to back down and use a lighter weight, or even bodyweight.
Note: when an exercise becomes easy for you, increase the weight you are lifting, rather than increasing the number of reps.
REST:
30-90 seconds of rest between sets should be ideal. You want the recovery period to be long enough to feel fully rested before your next set.
SETS:
When you first begin this workout, aim for two sets of each exercise. As you progress and become more comfortable with the exercises, work your way up to 3-4 sets per exercise.
Once you are comfortable with 4 sets of 10-12, you’ll be ready to graduate to heavier loads, and different sets/reps/rest schemes.
8 Effective Beginner Strength Moves for Runners
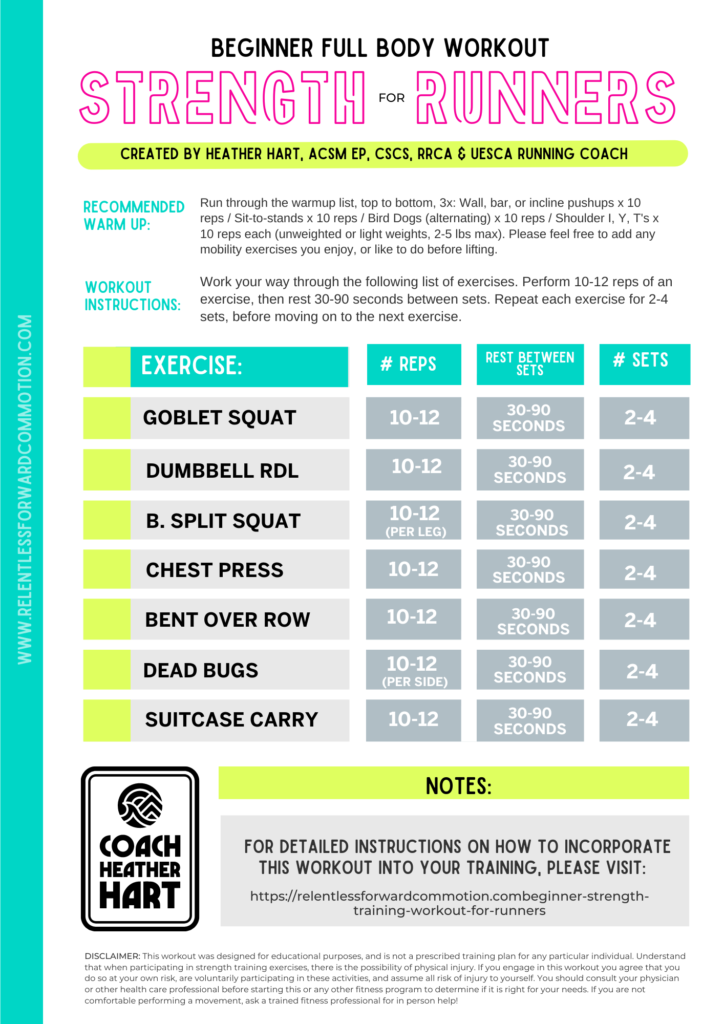
Work your way through the following list of exercises. Perform 10-12 reps of an exercise, then rest 30-90 seconds between before performing the next set of the same exercise. Repeat each exercise for 2-4 sets, before moving on to the next exercise.
1. Goblet Squat
Movement Pattern: Squat (hip extension, knee extension)
Muscles Targeted: Glutes, quadriceps, hamstrings, calves, abdominals, spinal erectors, forearms, biceps, shoulders
Equipment Needed: A single dumbbell, kettlebell, or other weight.
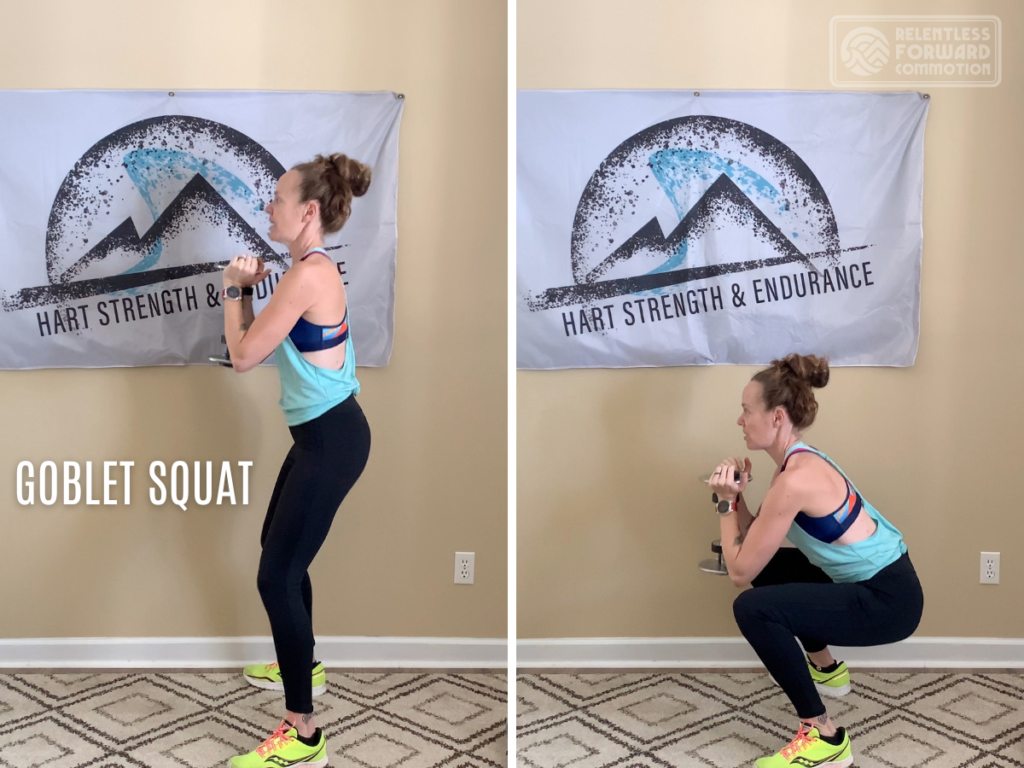
How to Perform a Goblet Squat:
- Start standing with your feet slightly wider than hip-width apart. Toes should be facing forward or slightly out to the side.
- Hold a single dumbbell (or kettlebell) in both hands at your chest with an underhand grip, so your elbows are out to the side.
- To begin the squat, bend your knees and send your hips back as if you were sitting in a chair. Keep your torso upright and gaze forward while maintaining a neutral spine, and keeping the weight close to your body.
- Keep your body weight evenly distributed across your feet or slightly more weighted toward your heels. You want to avoid shifting onto your toes or allowing your heels to come off the ground.
- When your thighs reach about or just below parallel to the floor, push through your heels to return to starting position
2. Dumbbell Romanian Deadlift (RDL)
Movement Pattern: Hinge (hip extension)
Muscles Targeted: Glutes, hamstrings
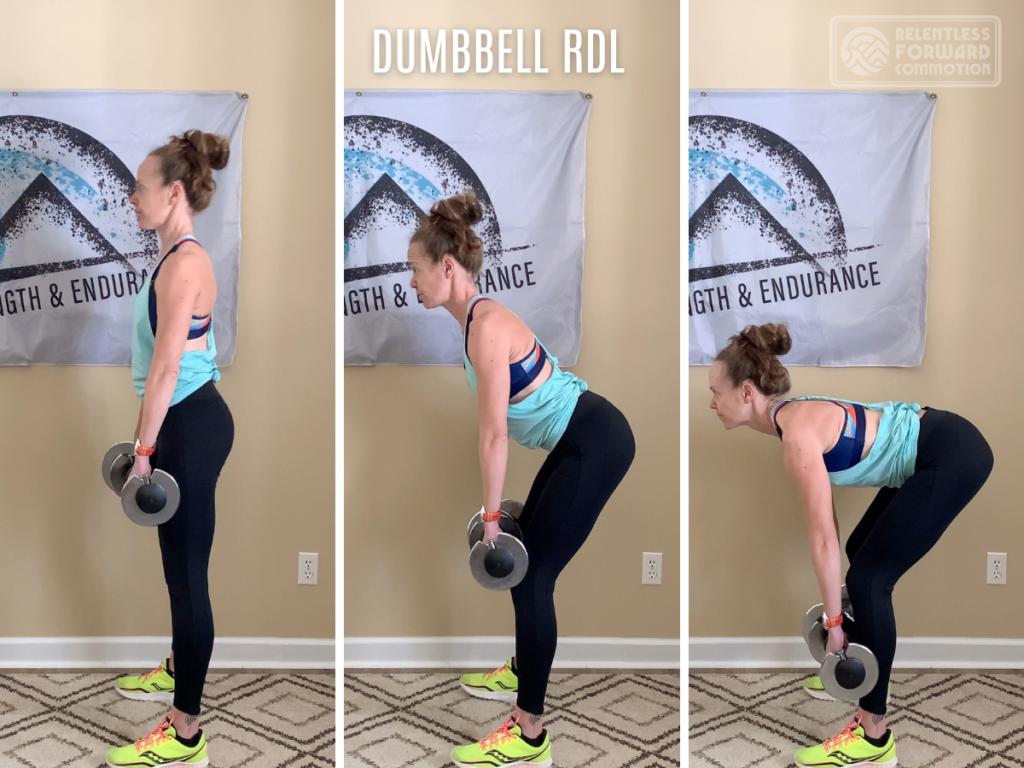
Equipment Needed: Pair of dumbbells
How to Perform a Dumbbell RDL:
- Stand with feet slightly wider than hip width apart, toes pointed slightly out for balance, with a closed, pronated grip on the dumbbells. Dumbbells should be hanging towards the ground, with arms fully extended in front of your thighs.
- Keeping your back in a flat neutral position, hinge forward at the waist while sending your hips backwards. Keep your knees in the slightly bent, unlocked position, but avoid full knee flexion.
- Keep the dumbbells as close the body, and arms fully extended as you lower towards the ground.
- Continue lowering until you reach your comfortable range of motion. At no point should your back arch in order to try and place the weights on the ground.
- From the bottom position of the movement, push through the feet, and begin extending your hips forward, allowing your torso to rise back into a standing position.
- Again, the dumbbells should remain as close to the body as possible. Continue to extend the hips and knees until the body reaches a fully erect standing position.
3. Bulgarian Split Squat
Movement Pattern: Hip extension, knee extension, unilateral.
Muscles Targeted: Glutes (Gluteus maximus) and hamstrings.
Equipment Needed: A stable bench, box, or chair that is approximately knee height or slightly lower, and dumbbells or other weights.
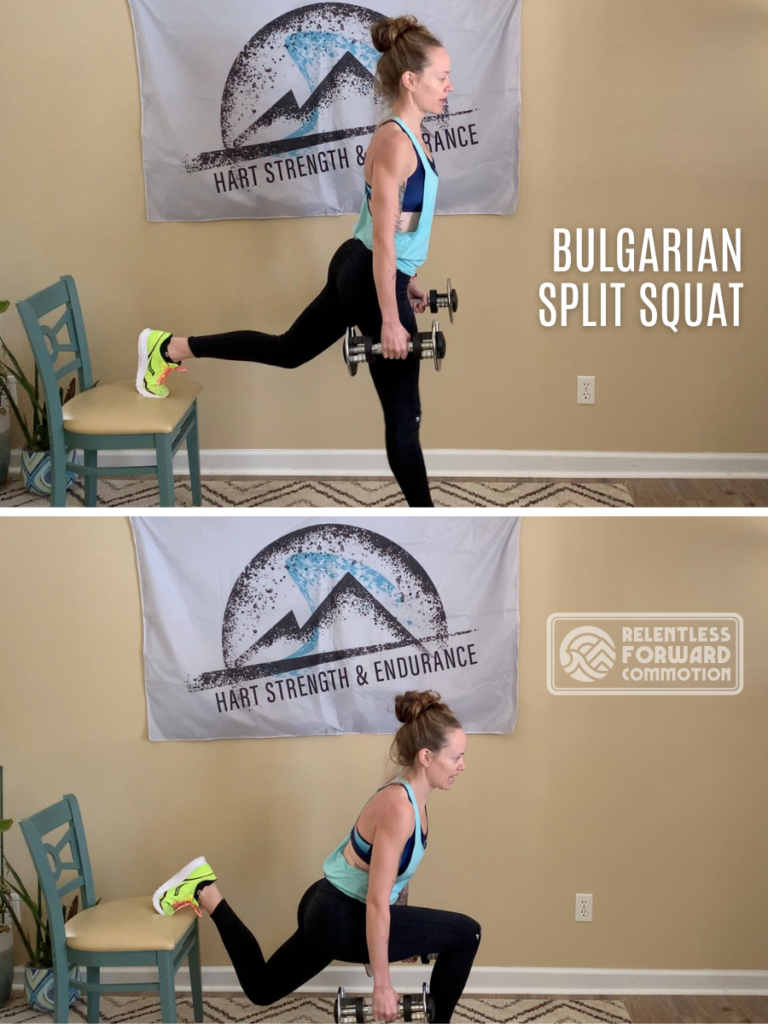
How to Perform a Bulgarian Split Squat:
- Stand in front of a bench/box/chair, facing away, while holding dumbbells in either hand.
- Place the instep or toe of your right foot on the chair. Keep both of your knees slightly flexed while standing upright. Keep your spine, head, and neck in a neutral position. This is your starting position
- Flex the hips and knees of BOTH legs simultaneously to lower yourself towards the ground. Keep your torso in the same neutral position, all of the work is done by your legs!
- Keep lowering until your front supporting thigh is parallel to the floor (or close to it).
- Push back to starting position focusing on pushing through the front leg. Try to keep that leg facing forward, do not allow the knee to shift inward or outward.
- Repeat for # of reps, then switch to the opposite side.
*NOTE* if you struggle with balance during the Bulgarian split squat, substitute this move with a weighted reverse lunge.
4. Dumbbell Chest Press
Movement Pattern: Push
Muscles Targeted: Chest (pectoralis major & minor), shoulders (anterior deltoid, serratus anterior), triceps
Equipment Needed: Pair of dumbbells. Optional (if available): weight bench.
How to perform a dumbbell chest press:
- Lay down on the floor or on a weight bench.
- If laying on the floor, bend your knees so that your feet are flat on floor, creating stable points of contact.
- If laying on a bench, make sure your body has five points of contact with the bench and/or floor, including:
- left and right foot flat on the floor OR foot pegs on bench
- butt is firmly sitting on the bench
- shoulders and upper back are placed firmly and evenly on the bench
- head place firmly against back of the bench
- With dumbbells in a neutral hand position, arms come out to the sides perpendicular to the torso, elbows bent at a 90 degree angle.
- Keeping the wrists stiff, push the dumbbells up towards the ceiling (both arms controlled and at the same rate of speed) until they come together, centered over your body between the chest and face. Arms should be fully extended, but not locked at the elbows.
- From the top position, slowly and with a controlled movement, lower the dumbbells in an arched motion down and slightly out until:
- elbows lightly touch the floor, or
- (when using a bench) until the dumbbells are approximately chest level, with elbows lower than the bench.
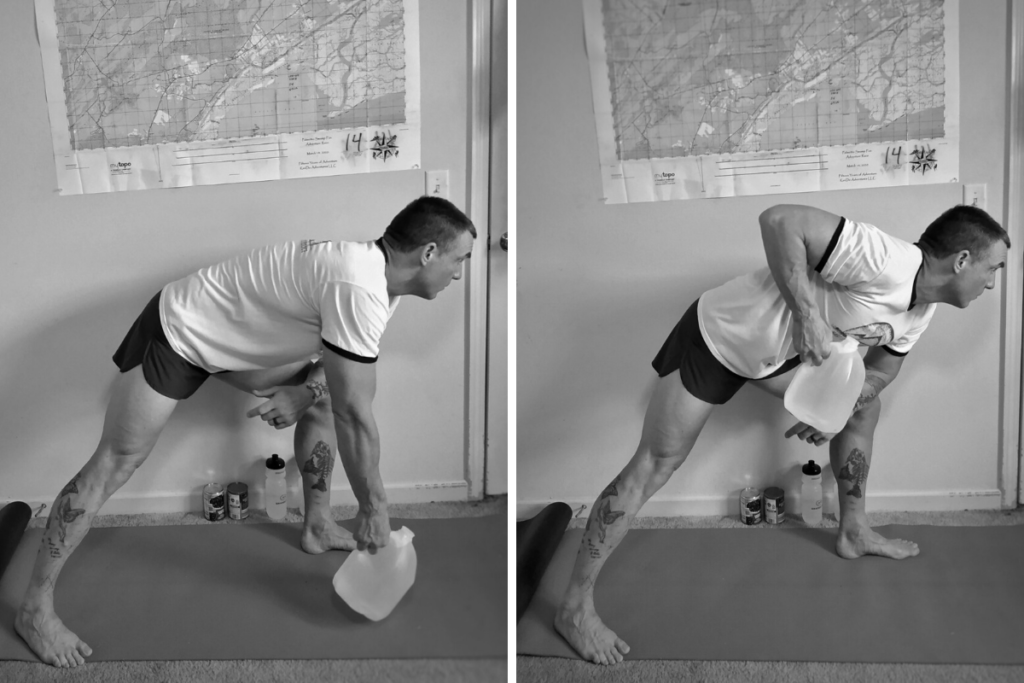
5. Bent Over Supine Grip Dumbbell Row
Movement Pattern: Pull
Muscles Targeted: Upper & mid back (latissimus dorsi, teres major, middle & lower trapezius, rhomboids), biceps, and posterior deltoid of the shoulder.
Equipment Needed: Pair of dumbbells.
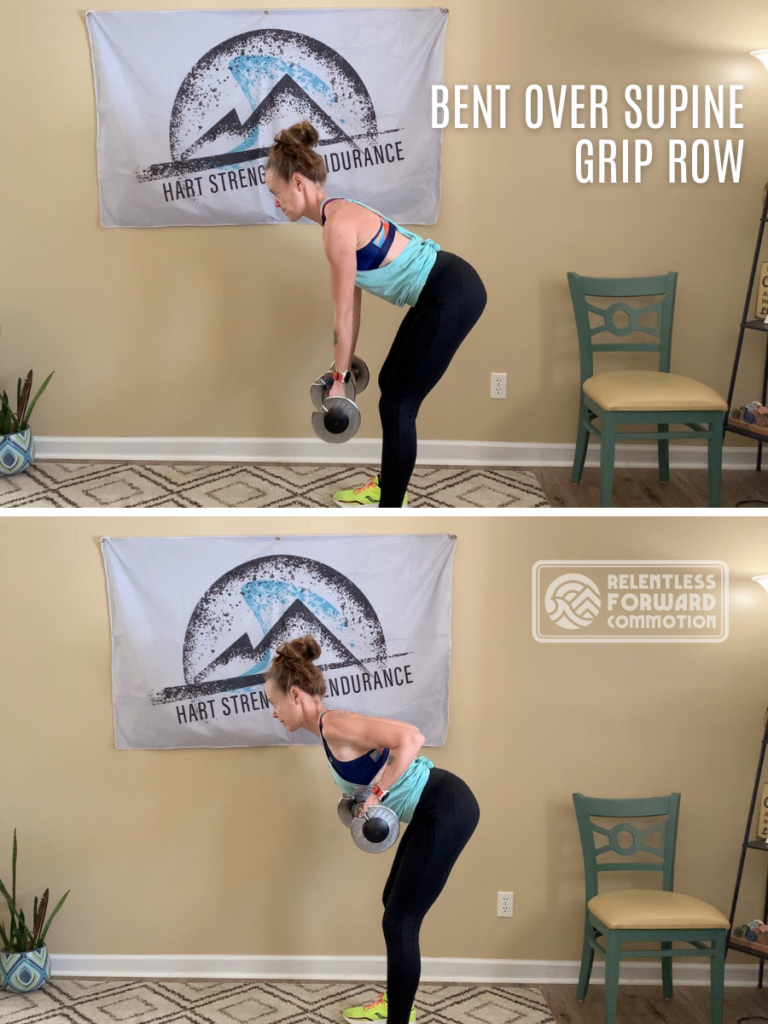
How to Perform a Dumbbell Row:
- Place your feet about hip width apart.
- Dumbbells are in your hands in a closed, neutral grip.
- Flex forward at the hips so your torso is slightly above parallel to the floor. Keep your back neutral (not rounded)
- Allow the dumbbell to hang down a full elbow extension
- Pull your shoulders back and push chest slightly forward.
- Pull the dumbbell up towards your torso, allowing your elbow to lead the movement, while keeping your arms close to your body.
- Continue pulling upward until the dumbbell touches the side of your chest or rib cage. Imagine your shoulder blades squeezing together – this is the top of the movement.
- Lower the dumbbell slowly and with control maintaining a stationary torso, until you return to the starting position.
6. Single Arm Suitcase Carry
Movement Pattern: Carry. Weighted carry exercises (often referred to as a “loaded carry”) are exactly what they sound like: pick up something heavy, and carry it from one point to another.
Muscles Targeted: Carries truly are a full body exercise! The suitcase carry utilizes your quadriceps, hamstrings, glutes, calves, back (latissimus dorsi and erectors) abdominal muscles, biceps, triceps, forearms, and the muscles of your hand.
Equipment Needed: A single dumbbell, kettlebell, or other weighted object.
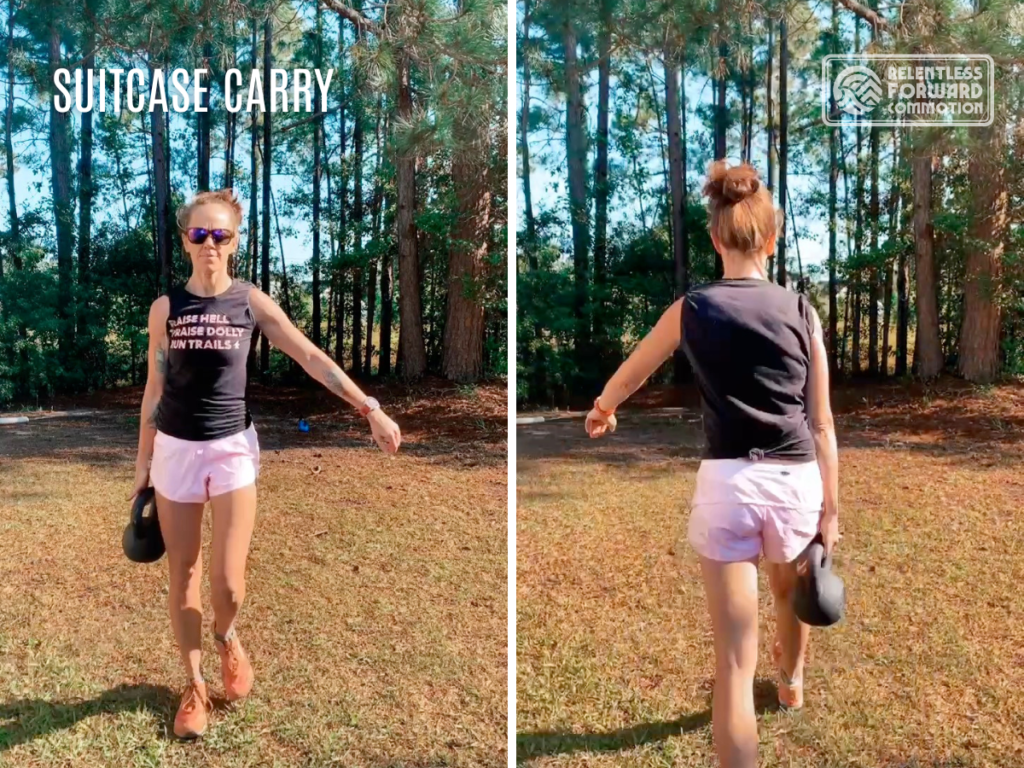
How to Perform the Suitcase Carry Exercise:
- Pick up a dumbbell or other weight in one hand. Stand with your feet shoulder width apart, arms hanging at side. Engage your core. Stand tall with neutral, upright posture. Pull your shoulder blades down and back in order to actively hold the weight.
- Pick a focal point, and start walking towards it while carrying the weight in your hand.
- Take controlled and smooth steps, focusing on keeping your posture tight and tall. Try not to lean to one side to compensate for the weight.
- Once you get to one side of the room/gym/yard, put the weight in the other hand, and repeat!
7. Dead Bug
Movement Pattern: Anti-rotation
Muscles Targeted: Pretty much all of the muscles of your core (rectus abdominis, internal & external obliques, transverse abdominis) back (multifidus, erector spinae), muscles of the pelvic floor, and to some extent, hip flexors and shoulders.
Equipment Needed: a mat to lay on, and optional dumbbells for the loaded (weighted) version.
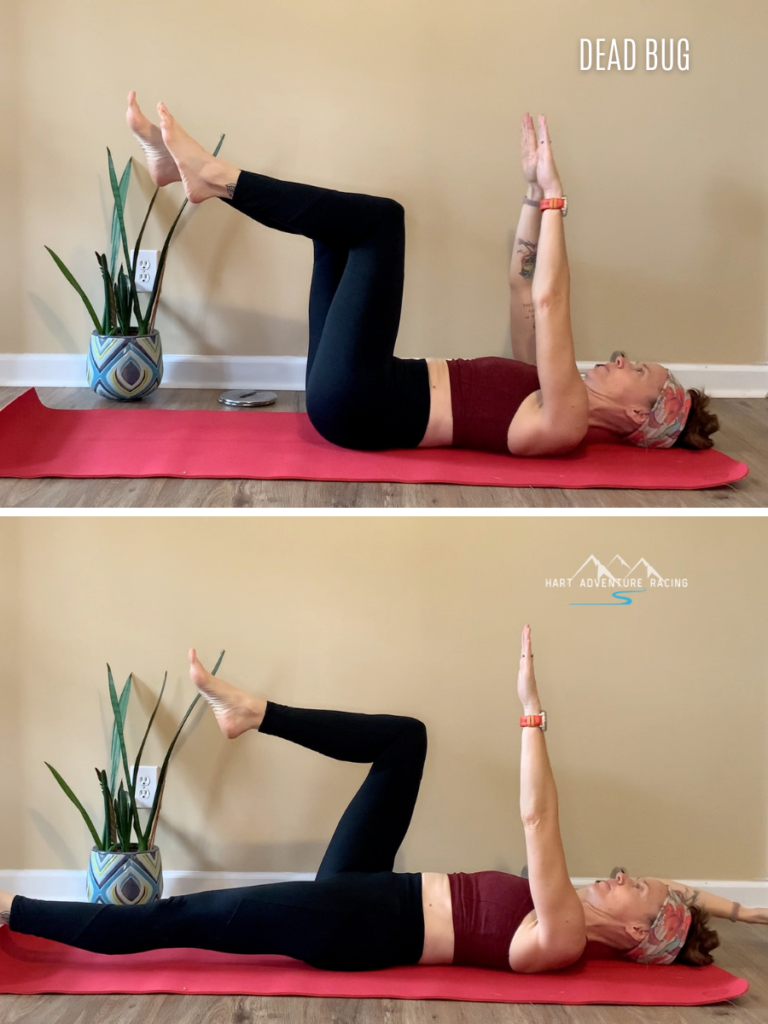
How to Perform the Dead Bug Exercise:
- Lay on your back, knees bent, feet flat on the floor/ground.
- Brace your core by squeezing your abdominal muscles and low back. Imagine bringing the bottom of your ribcage towards your hips, while pushing your low back into the floor. Don’t forget to keep breathing, do not hold your breath!
- While maintaining the braced position, bring your knees up to a 90 degree angle, and your arms straight up overhead, perpendicular to the floor and your torso.
- Keeping the core engaged and low back pushed into the ground, extend one leg straight out, while keeping the opposite leg at a 90 degree angle. Simultaneously, extend the opposite arm out overhead, keeping the other arm down by your side.
- Note: the further you extend your leg and the closer you bring it towards the ground (but don’t touch the ground!), the more difficult the exercise will be. If at any point your back arches off the ground, you have gone too far. Reset, and try again, perhaps keeping the foot closer to the body.
- Return arm and leg to start position, and repeat on the other side. Alternate legs and arms with each repetition.
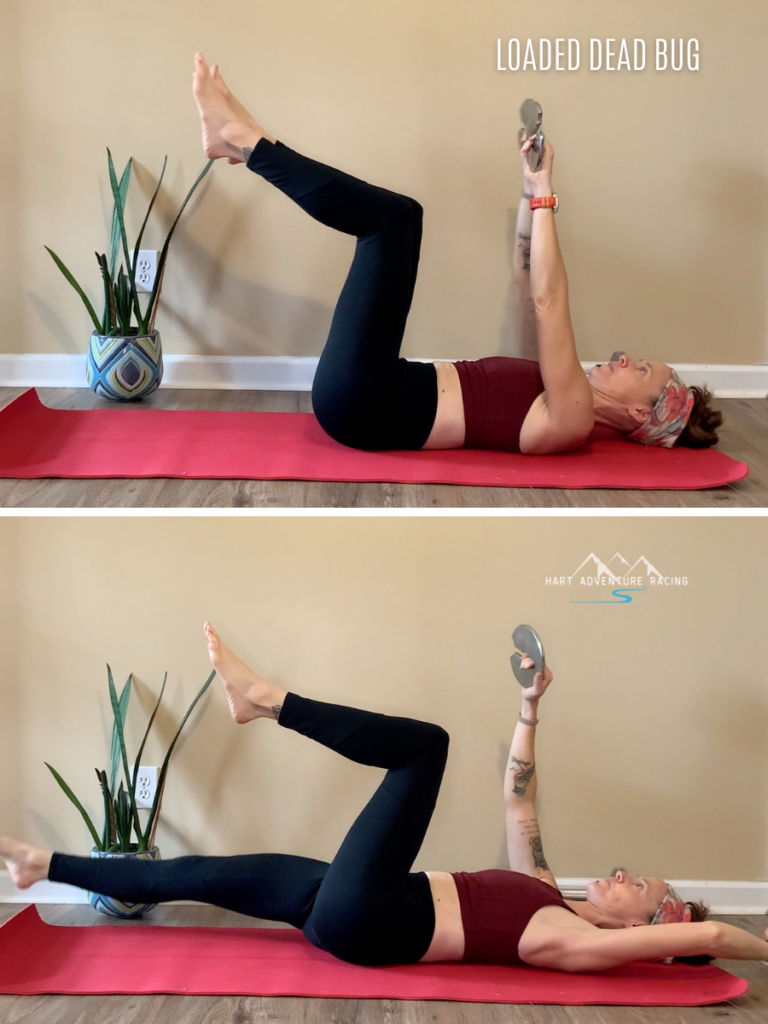
Loaded Dead Bug Variation:
Loaded Dead Bugs can be performed with small dumbbells, or weight plates that you can safely and securely hold in your hands.
Perform the exercise the same as a regular Dead Bug, being careful to control the weight on the lift and lower. If at any point your back arches off of the ground, or you are struggling to perform the exercise, the weight you are using is too heavy. Reduce the weight until you can perform the exercise with control.
Want more core exercises? Check out this 30 minute core workout for endurance athletes on our sister adventure racing site.
Now it’s time to put it all together! CLICK HERE to download a PDF version of the strength training program pictured below. And if you have any questions, please do not hesitate to leave a comment or reach out via email!
Now, go lift weights!
Heather Hart is an ACSM certified Exercise Physiologist, NSCA Certified Strength and Conditioning Specialist (CSCS), UESCA certified Ultrarunning Coach, RRCA certified Running Coach, co-founder of Hart Strength and Endurance Coaching, and creator of this site, Relentless Forward Commotion. She is a mom of two teen boys, and has been running and racing distances of 5K to 100+ miles for over a decade. Heather has been writing and encouraging others to find a love for fitness and movement since 2009.

Leave a Reply