Last Updated on October 25, 2022 by Heather Hart, ACSM EP, CSCS
Looking to improve your power and running speed by incorporating plyometrics exercises into your training? Look no further.
My name is Heather Hart, I’m a Certified Strength & Conditioning Specialist (CSCS), Exercise Physiologist, and Running coach. I’ve designed four different plyometric exercise workouts for runners to share with you, as well as hopefully help you understand how to properly structure a plyometrics workout so you can build your own.
In this post we’ll cover:
- What are Plyometrics?
- Plyometrics Safety Considerations
- How to Structure a Plyometrics Workout
- The 10 Best No-Equipment Needed Plyometrics Workout for Runners (including downloadable PDF’s of both beginner and intermediate to advanced no-equipment necessary workouts)
- The 10 Equipment Based Plyometric Exercises for Runners (including downloadable PDF’s of both beginner and intermediate to advanced equipment based workouts)

What Are Plyometrics?
For a far more in-depth explanation of the science behind plyometrics, why runners should incorporate them into their training, and how to make sure you’re incorporating them correctly, please visit the post: Plyometrics for Runners: You’re (Probably) Doing them Wrong.
How Do Runner’s Benefit From Plyometrics?
Plyometric training helps improve running performance for endurance athletes by allowing muscles to produce more force with less energy, which in turn results in improved running economy (meaning, it takes less energy for your body to run at any given pace.)
How Often Should Runners Incorporate Plyometric Exercises?
The number of plyometric training workouts per week (or “frequency”) typically ranges from one to three.
However, this will vary greatly based on your current fitness level, your experience with plyometric exercises, and where you are in your particular running training cycle.

Plyometrics Safety Considerations
Before incorporating plyometric exercises into your overall run training program, please take the following points into consideration:
Proper Equipment & Training Area
- Landing Surface: soft surfaces such as grass, a thick rubber mat, or a rubber track are recommended.
- Training area: make sure you have enough room to safely perform the exercises. A minimum of a 10 foot ceiling height is ideal if you are indoors.
- Equipment: all plyometric equipment should be sturdy and stable. Plyo boxes should have a non-slip surface. Stairs should be close faced to avoid toes getting caught
- Footwear: shoes should fit properly, have good ankle and foot support, with a wide, nonslip sole.
Athletic Readiness of the Runner
Not EVERY runner is an ideal candidate for adding plyometrics exercises to their training. Here are five important points to consider:
Strength
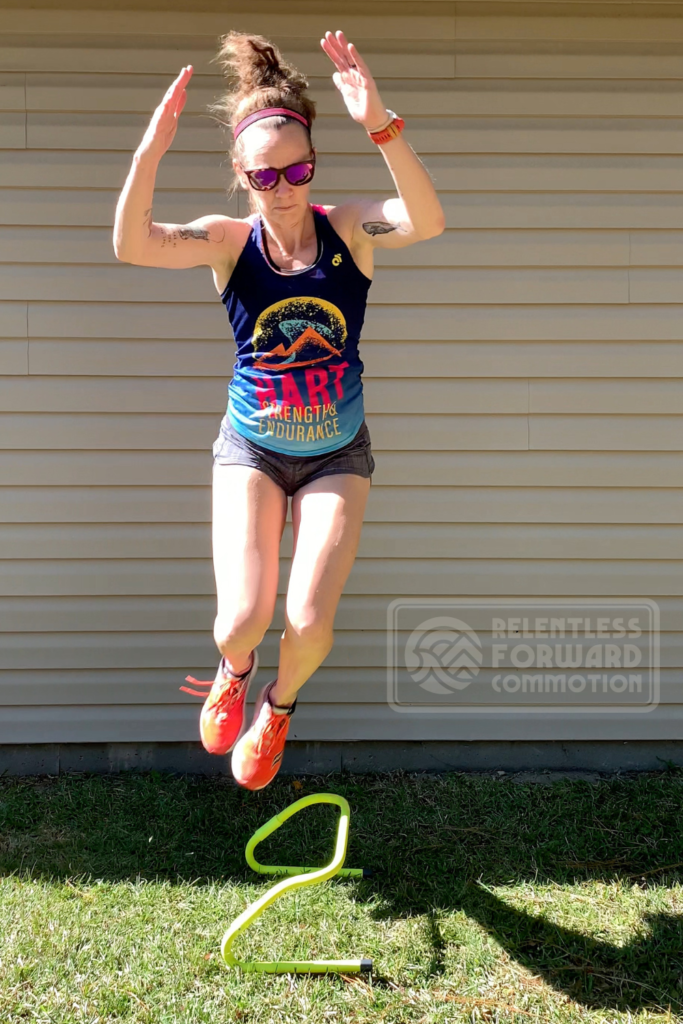
The National Strength and Conditioning Association recommends in their Position Stand on Explosive/Plyometric Exercises that only athletes who have already achieved high levels of strength through standard resistance training should engage in plyometric drills (5).
If you are a runner who does not focus on strength training, but wants to incorporate plyometrics, start with lower volume, lower intensity plyometric exercises. Focus on technique and proper progression, while slowly incorporating plyometric exercises into your workouts.
Balance
Plyometric exercises require a solid, stable support base in order to allow you to safely and correctly perform the movements.
In other words, you need to have sufficient balance.
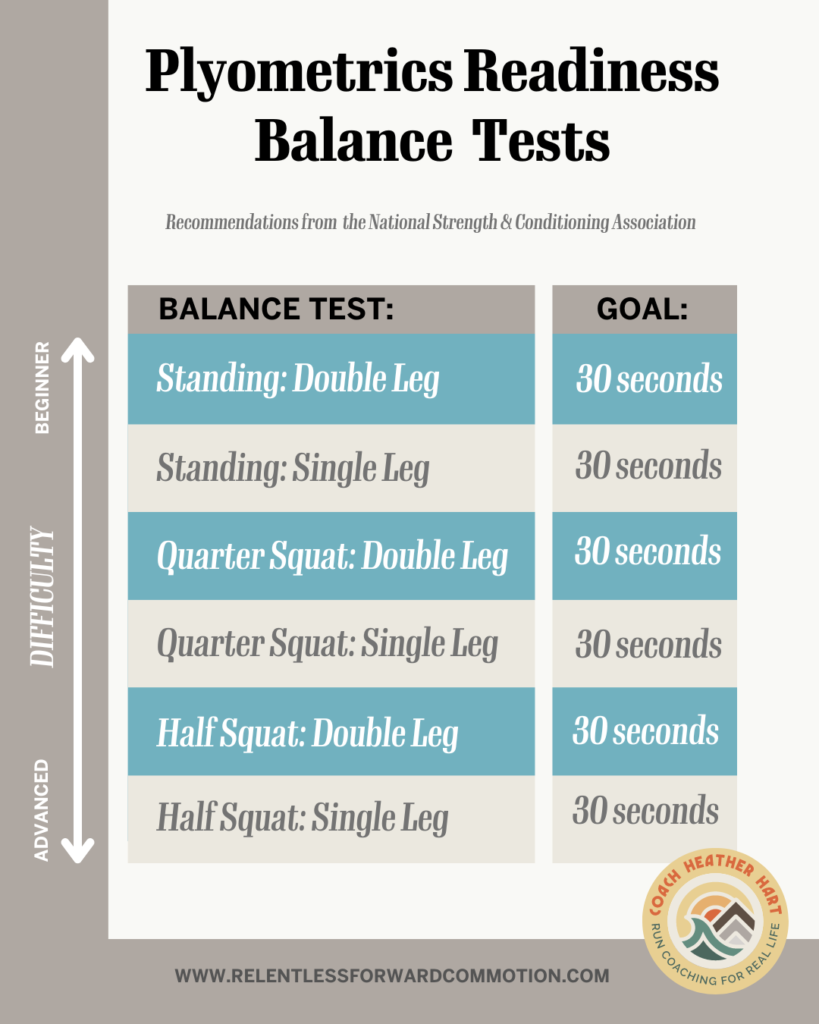
The chart below demonstrates three balance tests, in order of difficulty. Each test should be performed – without falling – for a minimum of 30 seconds before moving on to the next test.
The NSCA recommends that beginners are able to balance for 30 seconds standing on a single leg without falling before beginning a basic plyometrics exercise program.
Joint Structure / Mobility
Proper foot, ankle, and hip integrity & mobility is necessary before beginning plyometric exercises.
If you have compromised joints from a recent or recurring injury, or have limited mobility in your joints, consult with a physical therapist or strength & conditioning specialist before beginning plyometric exercises.
Proper Technique
You must be able to perform a given plyometric exercise with proper technique, including proper landing skills. Improper technique or landing can not only compromise the effectiveness of a given exercise, but could put you at risk for injury.
Physical Characteristics
I’m a firm believer in the fact that fitness is NOT defined by what you look like or how much you weigh. However, in the case of plyometrics, physics definitely come into consideration.
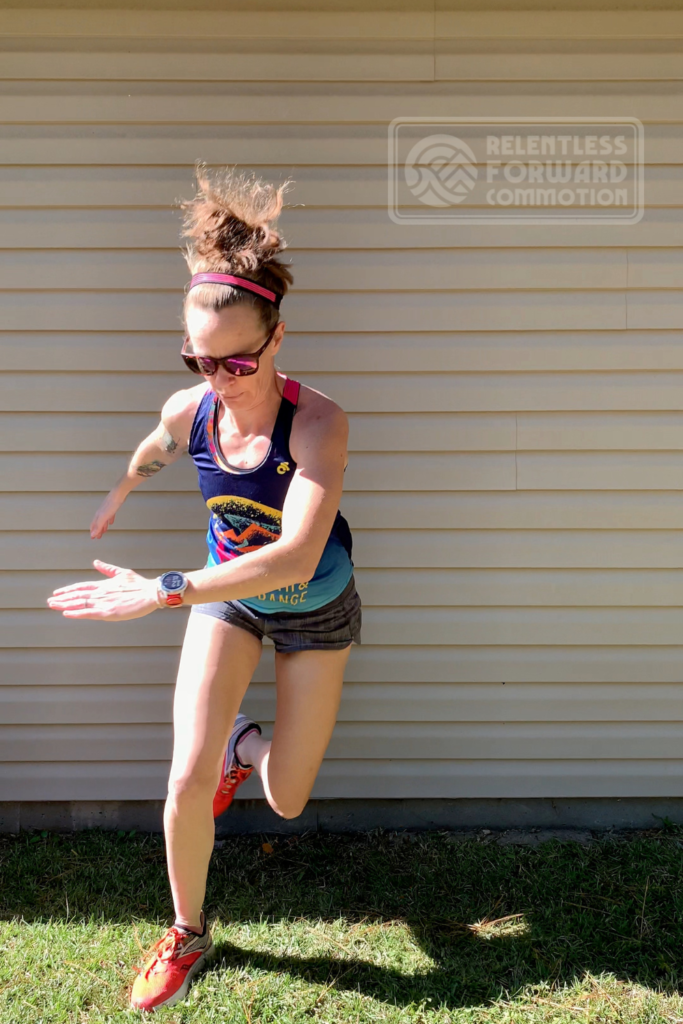
According to NSCA, runners & athletes who weight more than 220 lbs (100kg) may be at an increased risk for injury when performing plyometrics exercises. As a rule, athletes weighing over 220 lbs. should not depth jump from platforms higher than 18 inches.
Runners Who Should Avoid Plyometric Exercises:
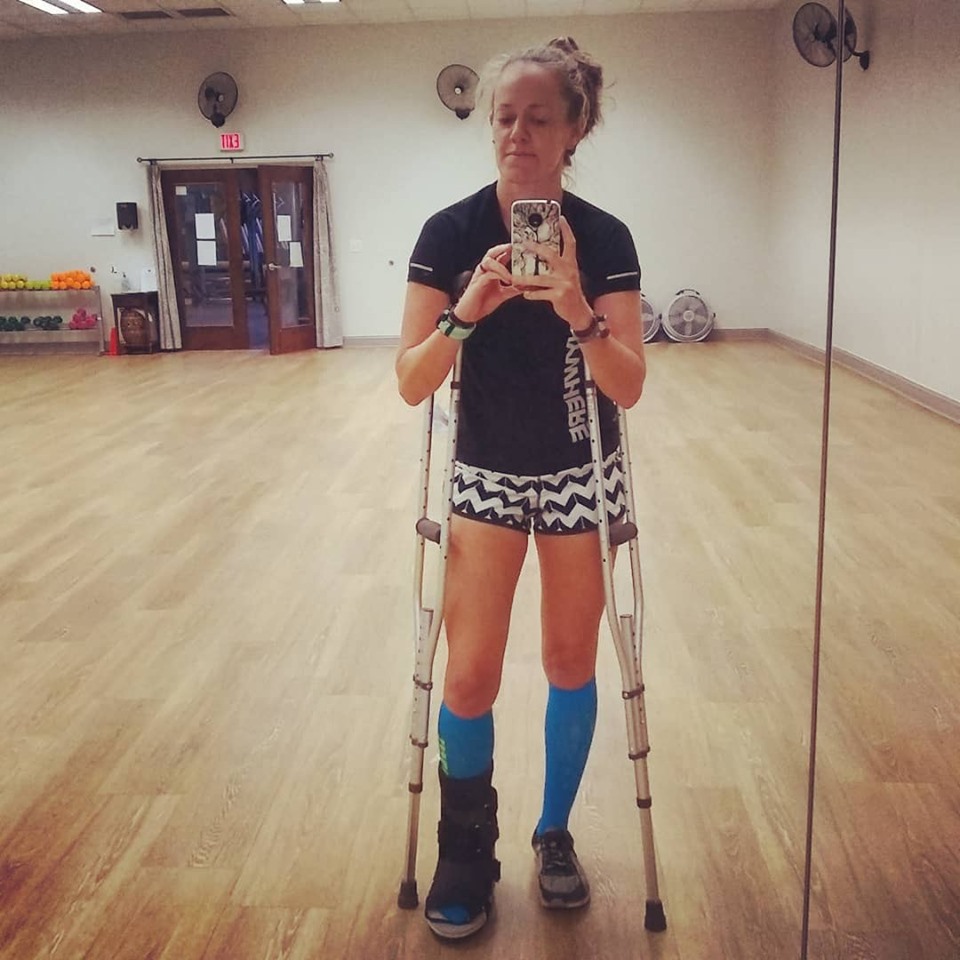
Runners who are currently injured, have any sort of preexisting orthopedic conditions (such as osteoarthritis, joint degeneration) or have had any sort of surgical joint intervention (such as knee or ankle surgery) should consult their physician or physical therapist before beginning plyometrics.
How to Structure a Plyometrics Workout:
So, now that you understand what plyometrics are, and how runners may benefit from them, let’s talk about how to structure a plyometrics workout.
Choosing Plyometric Exercises:
Specificity matters when it comes to training for sport performance, and plyometrics are no exception! You should choose plyometric exercises based on how they can assist with your sport performance goals.
For example, plyometric exercises such as bounds mimic the running gait, and are a better option for improving running performance over something like a heavy bag thrust.
If you are a trail runner, you may want to incorporate more lateral plyometrics drills, to mimic the unexpected change of direction that happens when encountering rocks or roots on trail.
Warm-Up:
The warm-up for plyometric exercises should consist of about 5-10 minutes of lower effort aerobic exercise, such as an easy warm-up effort run.
Next, you’ll want to go through specific warm up drills that mimic the movements of the plyometric exercises. Examples include:
- Marching
- Toe-jogging drill
- Straight-leg jogging drill
- Butt kickers
- Exaggerated skips
- Lateral shuffles
- Forward, side, and back lunges
The drill portion of the warmup should last another 5-10 minutes, for a total warm up time of 10-15 minutes.
Sets & Reps:
Plyometrics volume is usually given in number of repetitions and sets – similar to strength training. For lower body plyometrics, the repetitions are often referred to as the number of foot contacts per workout.
Remember, the purpose of plyometric exercises is to build explosive power and speed. Therefore, you should perform 2 to 6 sets of 3 to 8 powerful and clean reps (or, 3-8 reps per side, if it’s a unilateral exercise)
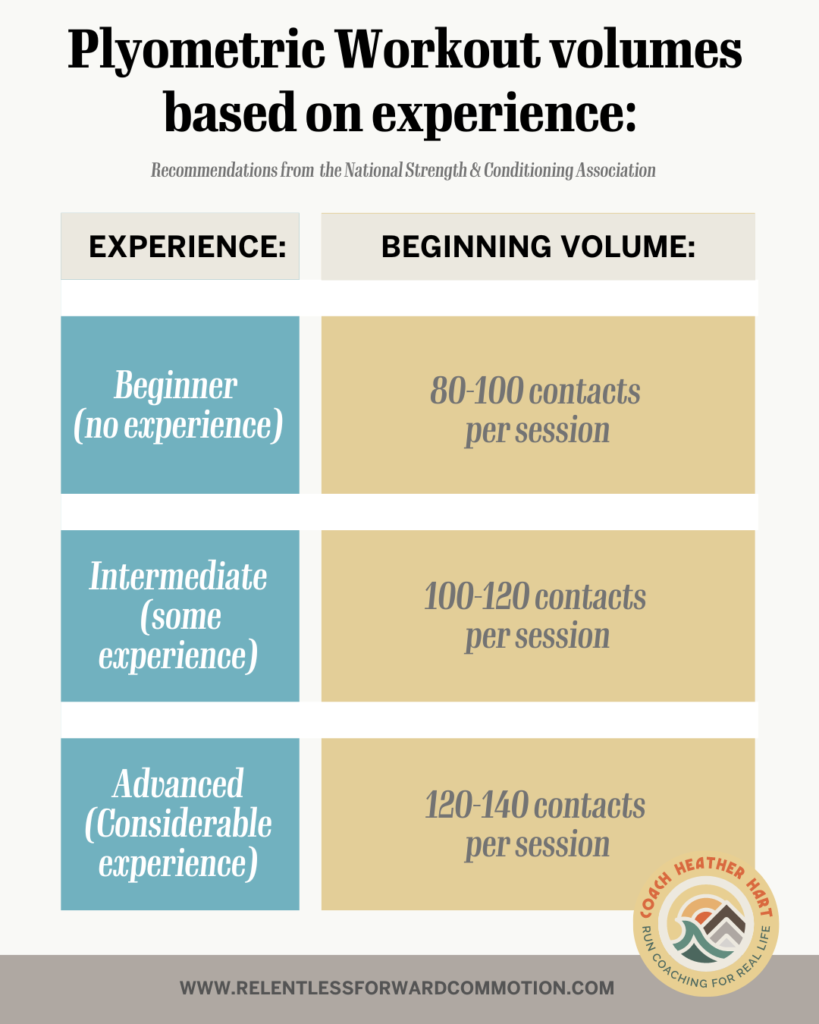
General recommendations from the National Strength and Conditioning Association suggest the following for appropriate plyometrics volume:
- Beginners (no experience): 80-100 contacts per workout session
- Intermediate (some experience): 100-120 contacts per workout session
- Advanced (considerable experience) 120-140 contacts per workout session
Recovery Periods Between Sets
Because plyometric exercises involve maximal efforts, sufficient recovery is necessary between sets.
The suggested work to rest rations for plyometrics are 1:5 to 1:10.
Meaning, if it took you 10 seconds to perform 8 squat jumps, then your rest interval before beginning the next set should be anywhere from 50 – 100 seconds.
Recovery Between Plyometric Workouts:
According to the National Strength & Conditioning Association, recovery periods between plyometric workouts should be between two to four days, allowing sufficient recovery to prevent overtraining.
Further, NSCA states that plyometric exercises for a given body area should not be performed two days in succession.

DISCLAIMER: The following workouts were designed for educational purposes, and are not a prescribed training plan for any particular individual. Understand that when participating in strength training and plyometric exercises, there is the possibility of physical injury. If you engage in this workout you agree that you do so at your own risk, are voluntarily participating in these activities, and assume all risk of injury to yourself. You should consult your physician or other health care professional before starting this or any other fitness program to determine if it is right for your needs. If you are not comfortable performing a movement, ask a trained fitness professional for in-person help!
10 Best No-Equipment Needed Plyometrics Workout for Runners
No equipment? No problem! Give this no-equipment plyometrics workout a try.
If you’re a beginner, start with 1-3 sets of exercises 1-6. If you’re an intermediate to advanced athlete with plyometrics experience, work your way through two sets of all ten exercises.
1. Squat Jump
Intensity level: low
Direction of movement: vertical
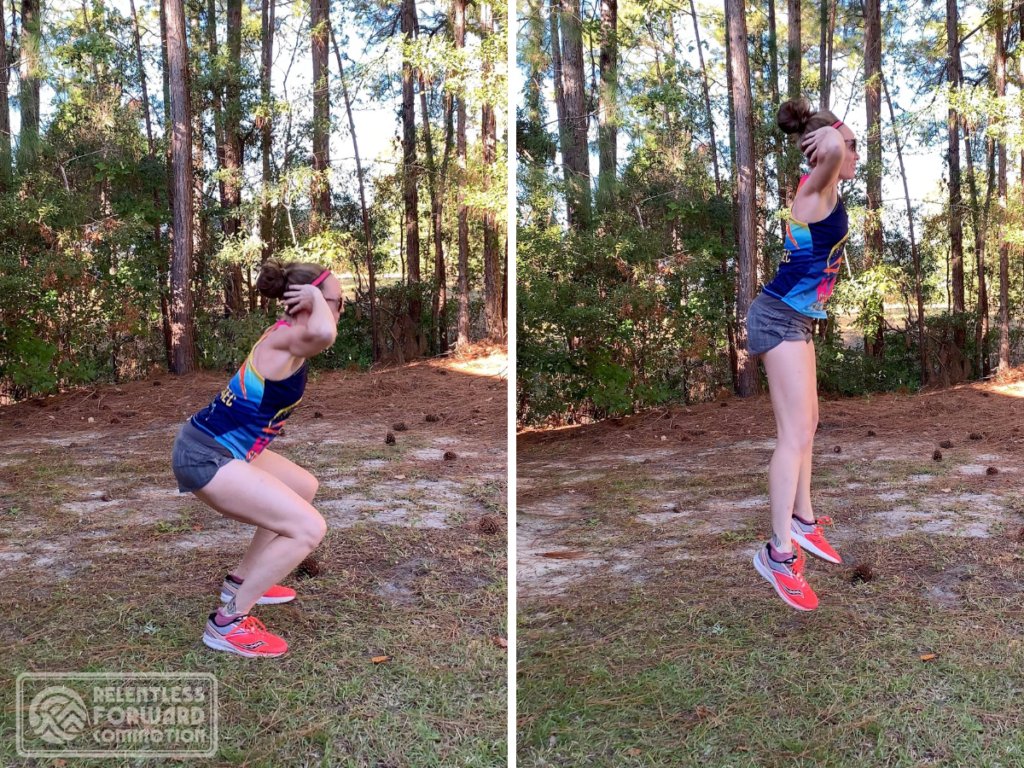
Begin in squat position, with feet slightly wider than hip width apart, toes pointed slightly out, butt back and weight in your heels, spine neutral and supported, and hands behind your head, with fingers interlocked.
Begin the movement by dipping into a squat with thighs slightly above parallel to the ground. Then, with big and powerful movements, jump into the air pushing up and through the toes.
As you land, allow your body to sink into soft knees back into squat position, allowing for a soft landing. Avoid locking knees and slamming back down to the ground. Immediately repeat the jump.
2. Power Skip
Intensity level: low
Direction of movement: horizontal and vertical
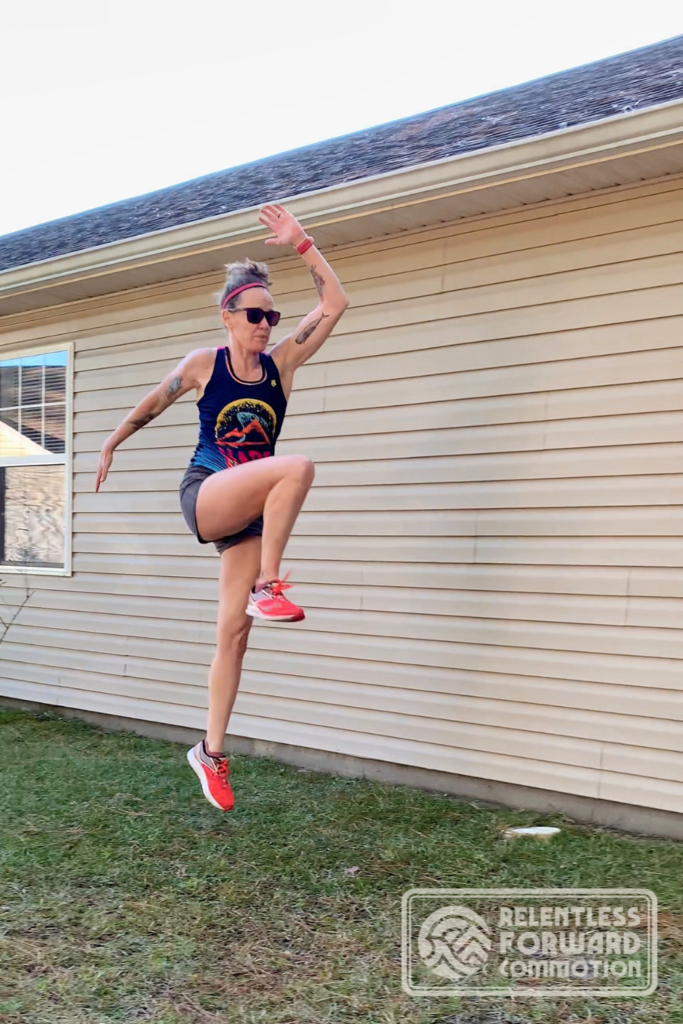
Begin with one leg lifted to approximately 90 degrees. Perform a countermovement of the supporting leg, then jump up and forward on that leg, using one or both arms to assist with the upward movement.
Land on the same (yes, same!) foot, then immediately repeat the skip with the opposite leg.
3. Wall or Box Push Off
Intensity level: low
Direction of movement: vertical and horizontal
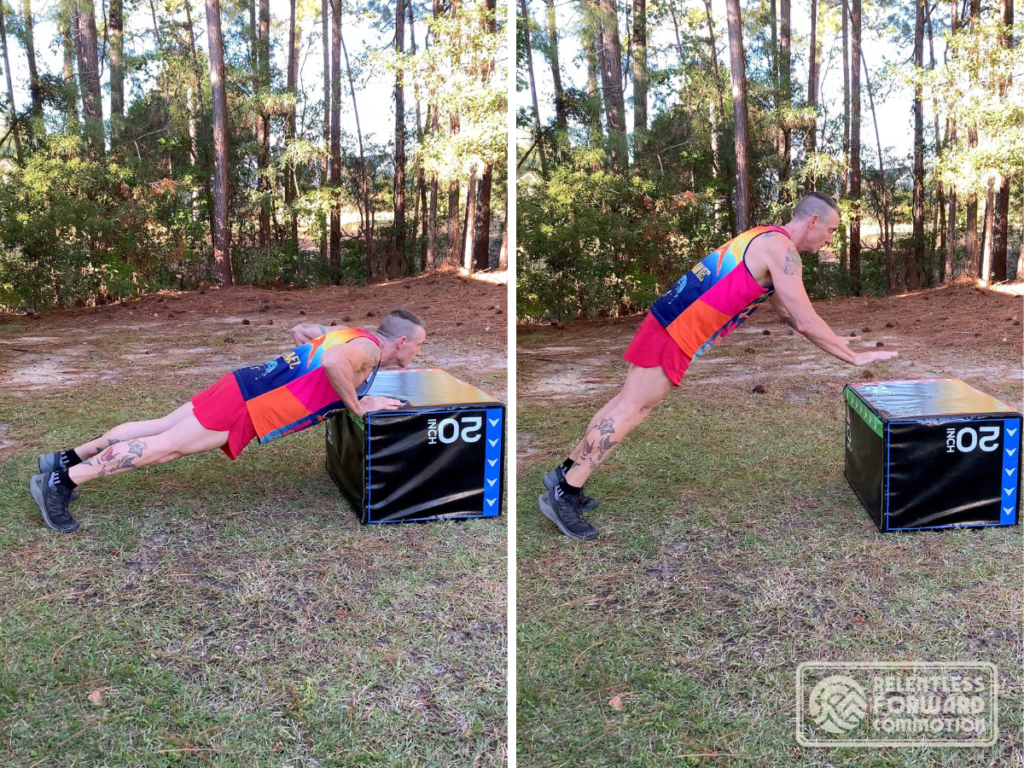
Stand one giant step away from a wall, facing the wall. Or, for runners with a stronger upper body, use a plyometric box. The closer you are to horizontal, the harder this exercise will be.
With slightly bent elbows, lean and fall into the wall with thumbs inward and fingers up. When your hands hit the wall, allow the elbows to slightly give to create a countermovement, then forcefully push away from the wall to bring your torso bak to original standing position. You should spend as little time as possible with your hands on the wall.
4. Single Leg Ankle Hop
Intensity level: medium
Direction of movement: vertical
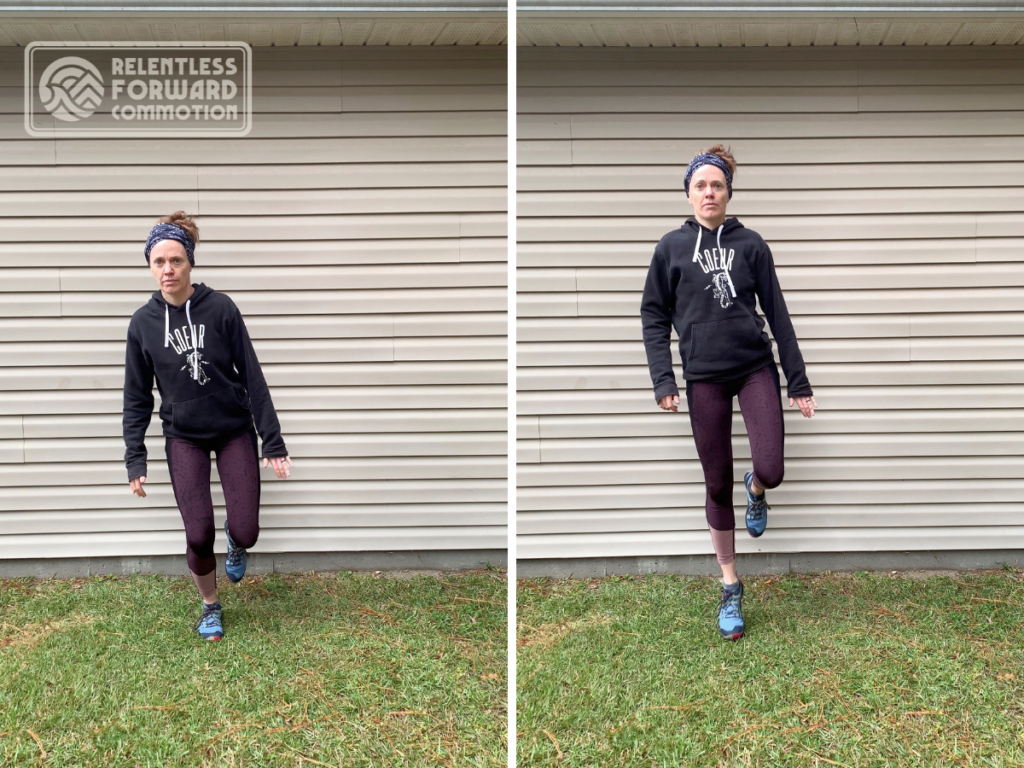
Start by balancing comfortably on one foot. Hold your non jumping leg in a stationary position, with the knee flexed enough to avoid contact with the ground (you don’t need to go full flamingo leg).
Begin with a slight bend of the supporting knee to provide countermovement, then hop up with the primary motion being in your ankle joint. You can either keep your arms by your side, or use them in a double arm swing for momentum.
Land on the same foot, allowing your body to sink into a soft knee and slight countermovement squat. Immediately repeat the hop on the same leg, while trying to continuously land in the same spot, avoiding horizontal or lateral movement.
*Note* this plyometric exercise is a hop, and not a full explosive “as high as you can go” jump like the single leg vertical jump (below).
5. Double Leg Tuck Jump
Intensity level: medium
Direction of movement: vertical

Stand upright with your feet shoulder width apart. Dip into a countermovement action, bending knees into a quarter squat, and swinging arms behind your body.
Explosively jump up, pulling your knees towards your chest, and grabbing your knees with your arms.
Quickly release your knees, coming back down into starting position. Land on both feet, allowing your body to sink into a soft knee and slight countermovement squat, arms swinging behind you. Immediately repeat the jump.
6. Single-Arm Alternate Leg Bound
Intensity level: medium
Direction of movement: vertical and horizontal
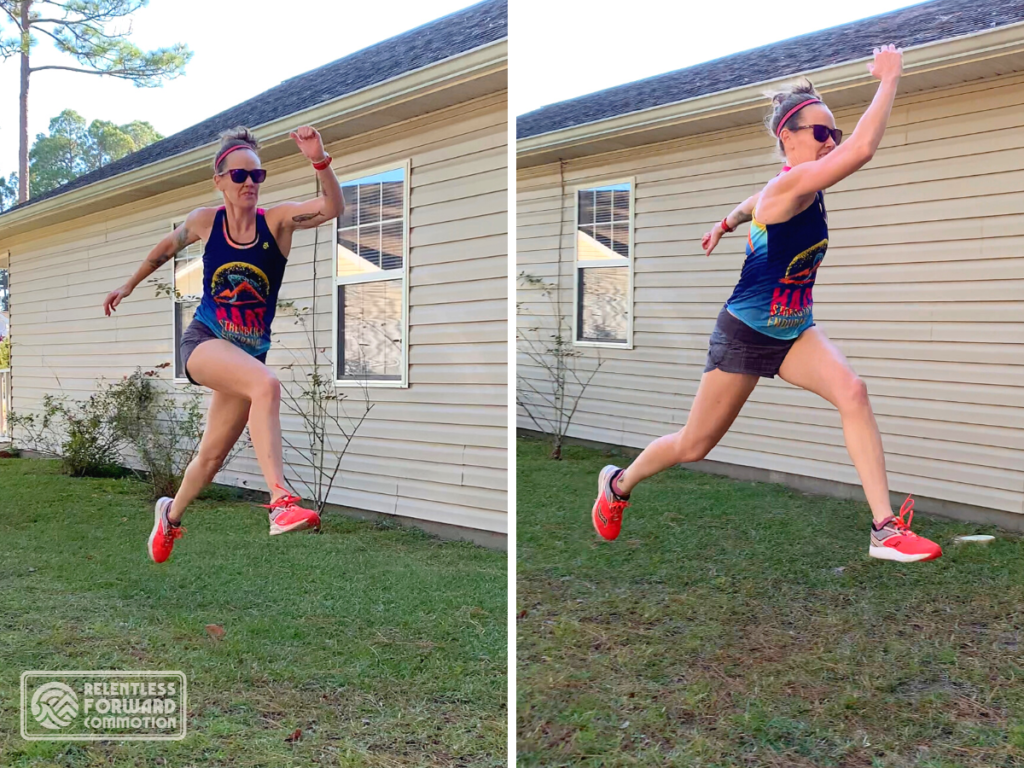
Begin jogging at a comfortable pace. After a few jogging paces, begin the plyometric bound by pushing off of one foot, bring the opposite leg forward in an exaggerated movement (a “bound”), until the thigh is approximately parallel to the ground and knee at 90 degrees. While in the air, you should be reaching forward with your opposite arm.
Land on the front foot, then immediately repeat on the opposite side.
The bound is an exaggeration of the running gait, you want your forward steps to be as long as possible.
7. Single Leg Bound
Intensity level: high
Direction of movement: horizontal and vertical
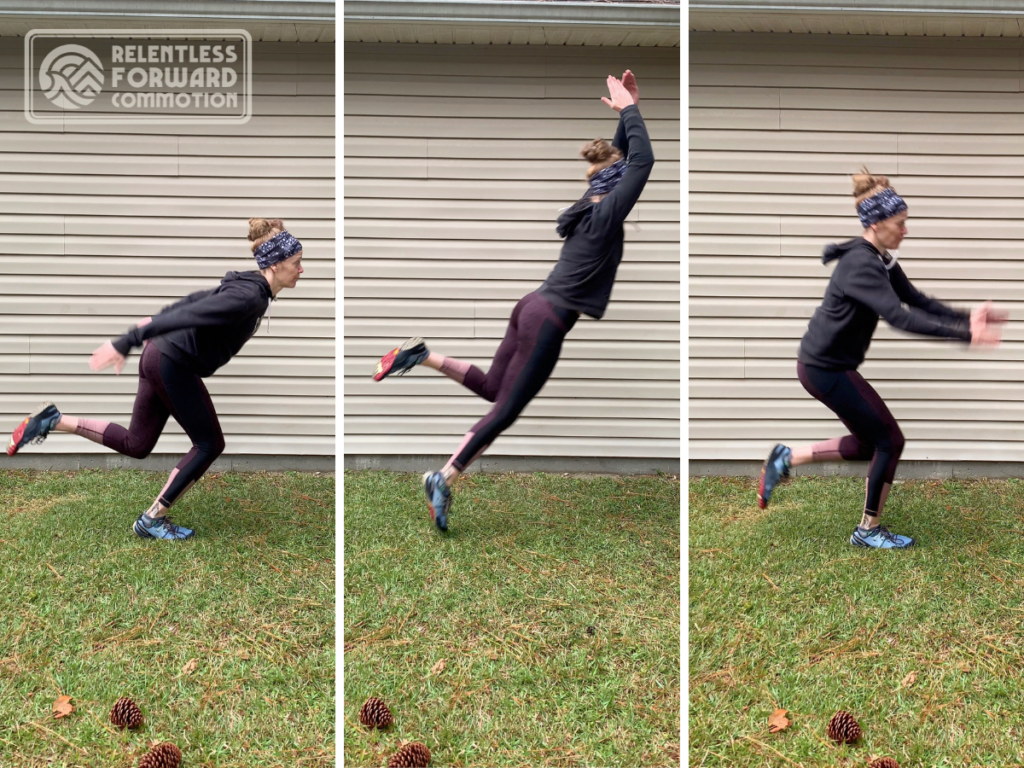
Start in an upright stance on one foot. The supporting knee should be slightly flexed. The opposite leg is bent at the knee, with your foot behind your body.
Begin with a countermovement, then explosively jump up and forward, using both arms to assist.
Land in the starting position, and immediately repeat the hop using the same leg.
8. Cycled Split Squat Jump
Intensity level: high
Direction of movement: vertical
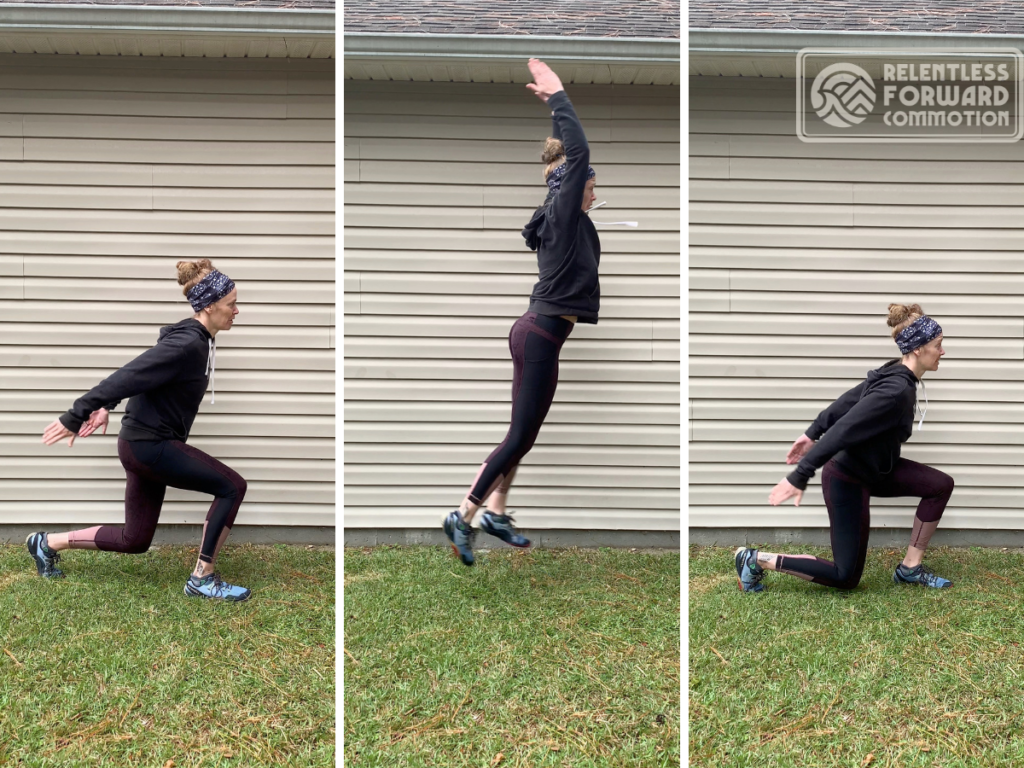
Begin in lunge position: one leg forward, with knee bent at approximately 90 degrees, and hips approximately 90 degrees from the torso. The trailing leg should be behind the centerline of your body.
Use a countermovement dip and reverse swing, then explosively jump up using your arms to assist. While in the air, switch leg position so that you land with the trailing leg now in the front. Immediately repeat the jump.
Note: When landing, maintain lunge position, but be sure to not lunge TOO deep, or you will lose the effects of the stretch shortening cycle.
9. Single Leg Vertical Jump
Intensity level: high
Direction of movement: vertical
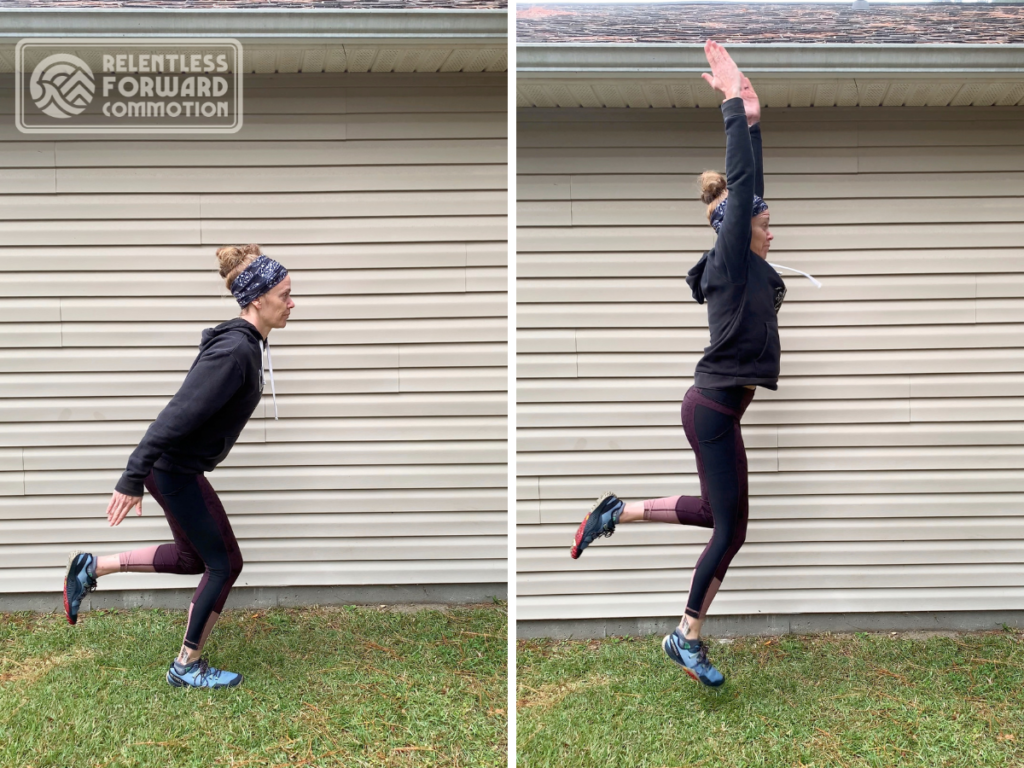
Start by balancing comfortably on one foot. Hold your non jumping leg in a stationary position, with the knee flexed enough to avoid contact with the ground.
With the jumping leg, use a countermovement slight squat to then explosively jump upward as high as possible. Use your arms as if you are reaching to grab something high above your head.
Land in the starting position on one leg, with a slight bend in the knee. Allow recovery time between jumps.
10. Skater Jumps
Intensity level: high
Direction of movement: lateral and slightly vertical
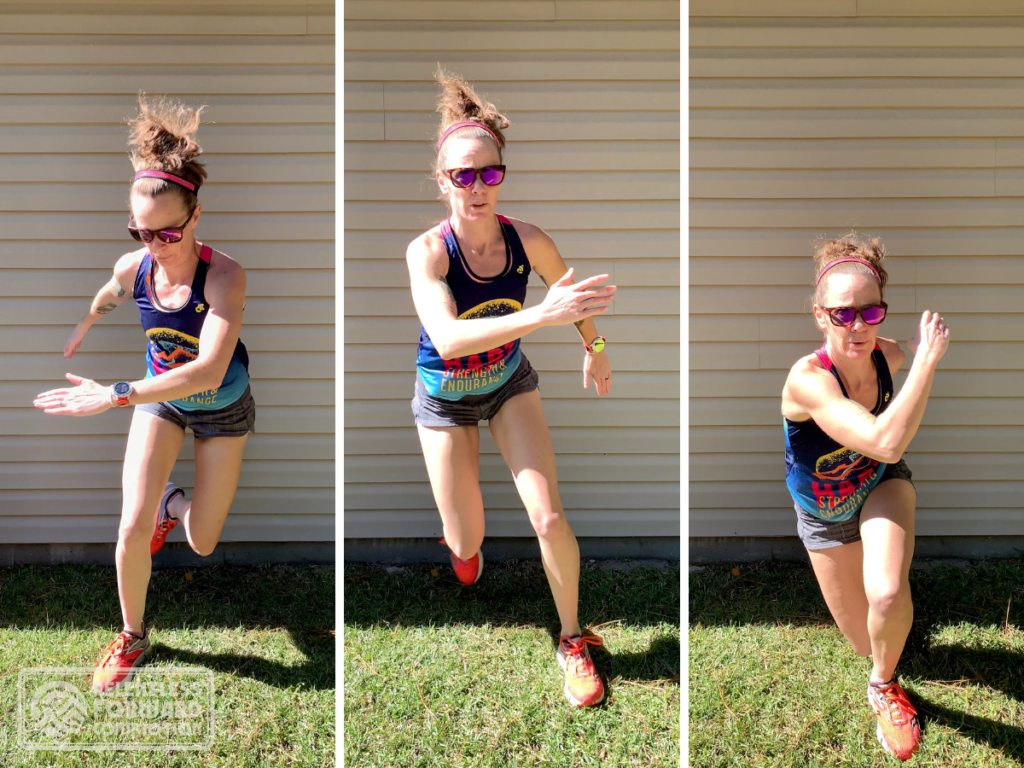
Take a big lateral jump to the side. Bend your supporting knee as you allow the opposite leg to tuck behind the supporting leg, almost like you are speed skating. Keep your core engaged, back flat, and gaze forward. Immediately explode back into a lateral jump in the opposite direction. Use your arms for balance and momentum.
10 Equipment Based Plyometrics Exercises for Runners
Equipment I personally use:
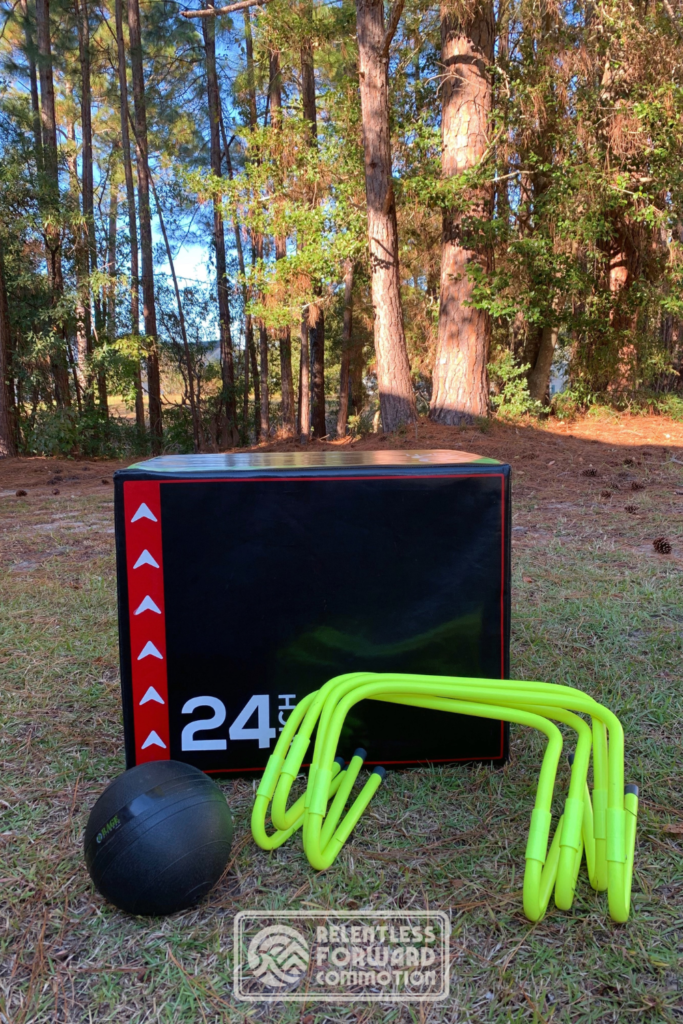
- 3 in 1 Plyometric Box with 20, 24, and 30″ sides. I highly recommend the heavy duty 60lb version vs. the 16 lb version, as it is significantly more stable and less likely to tip over.
- Rage Fitness Slam Ball (15 lbs)
- Agility Ladders: Set of 4 ladders as a part of a bigger agility kit from Yaegoo.
1. Lateral Push-Off
Intensity level: low
Direction of movement: vertical
Equipment needed: plyo box, 6-20 inches high
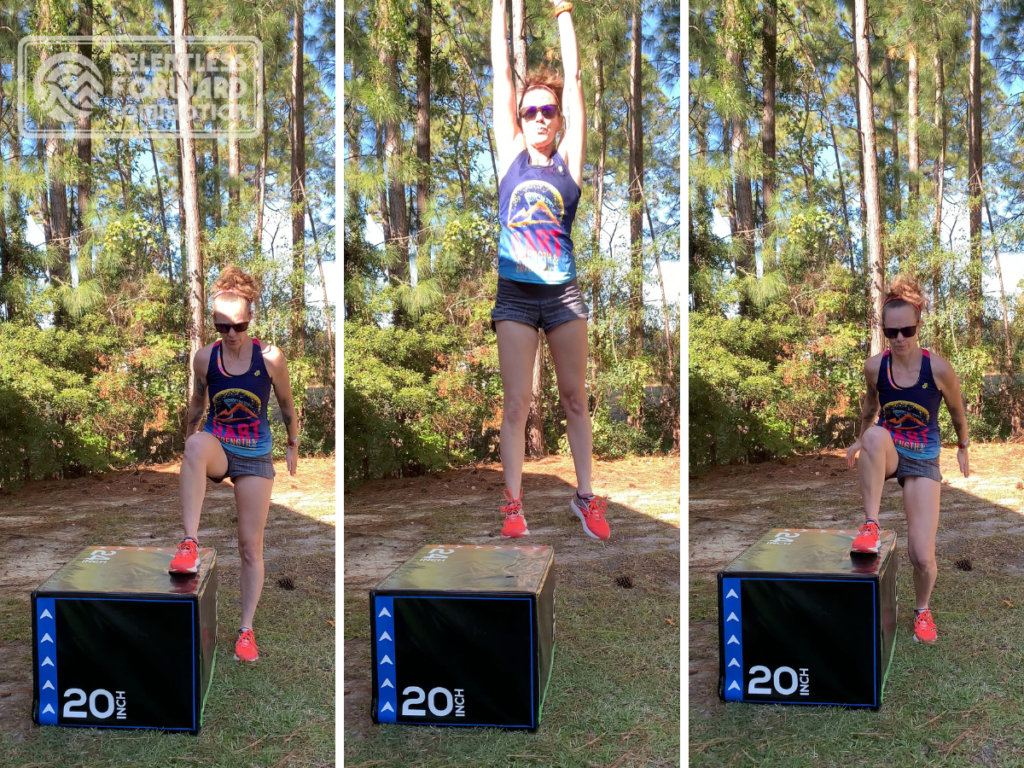
Stand to one side of the plyo box with one foot on the ground, and one on the box, close to the edge (but fully supported by the box). Push through the foot on the box to explosively jump into the air, using both arms to help with momentum.
2. Alternate Leg Push-Off
Intensity level: low
Direction of movement: vertical
Equipment needed: plyo box, 6-20 inches high
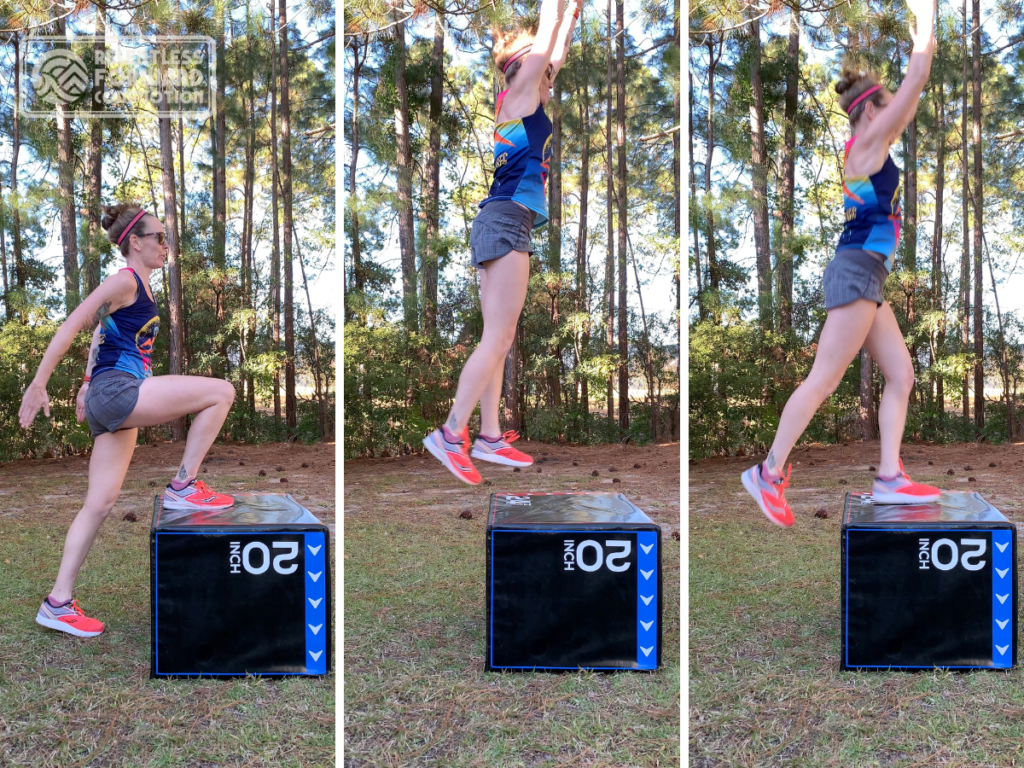
Stand facing the plyo box with one foot firmly on the box, the other on the ground. Push through the foot on the box to explosively jump into the air, using both arms for momentum. While in the air, switch feet so that the opposite leg foot is on the box, and the other foot lands on the ground. Immediately repeat the exercise, alternating legs as you go.
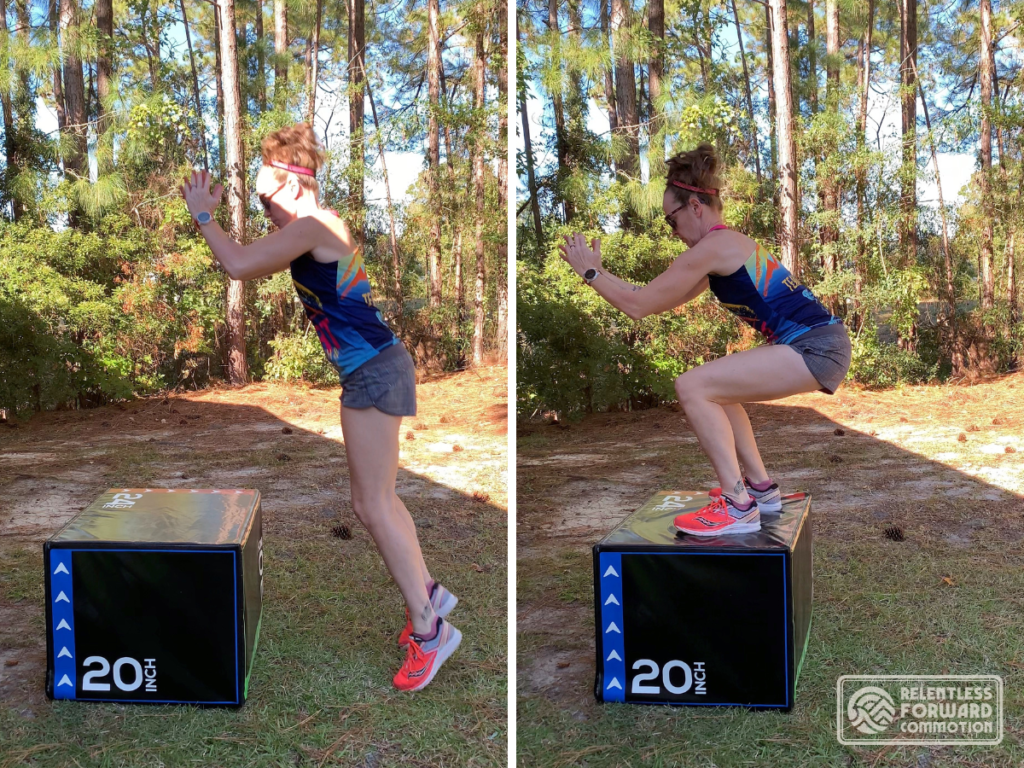
3. Double Leg Box Jump
Intensity level: low
Direction of movement: vertical & horizontal
Equipment needed: plyo box, 6-42 inches high
4. Two-Hand Overhead Throw
Intensity level: low
Direction of movement: forward and down
Equipment needed: weighted ball
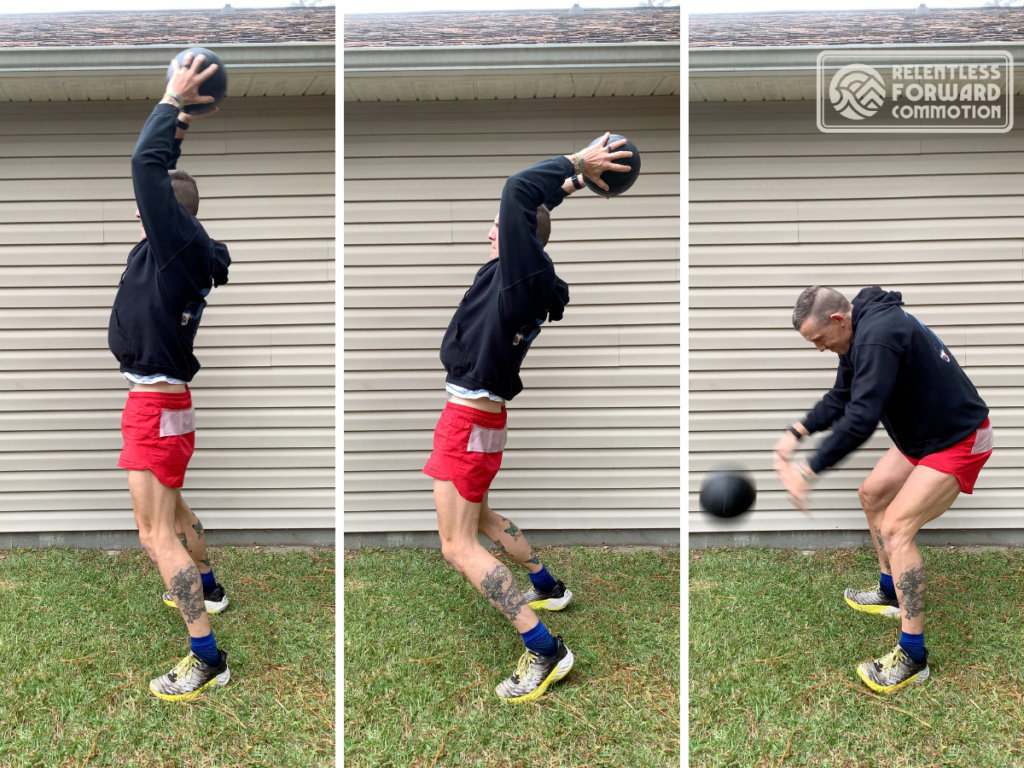
Get into a comfortable upright stance, with feet shoulder width apart, and holding a weighted ball in both hands overhead. Begin with an upper body countermovement: moving the arms slightly backward before throwing.
Next, using both arms throw the ball towards the ground forcefully, contracting your core and allowing your arms to follow through with the movement.
Pick up the ball and repeat.
5. Lateral Barrier Hop
Intensity level: medium
Direction of movement: lateral and vertical
Equipment needed: a barrier, such as a hurdle or a cone
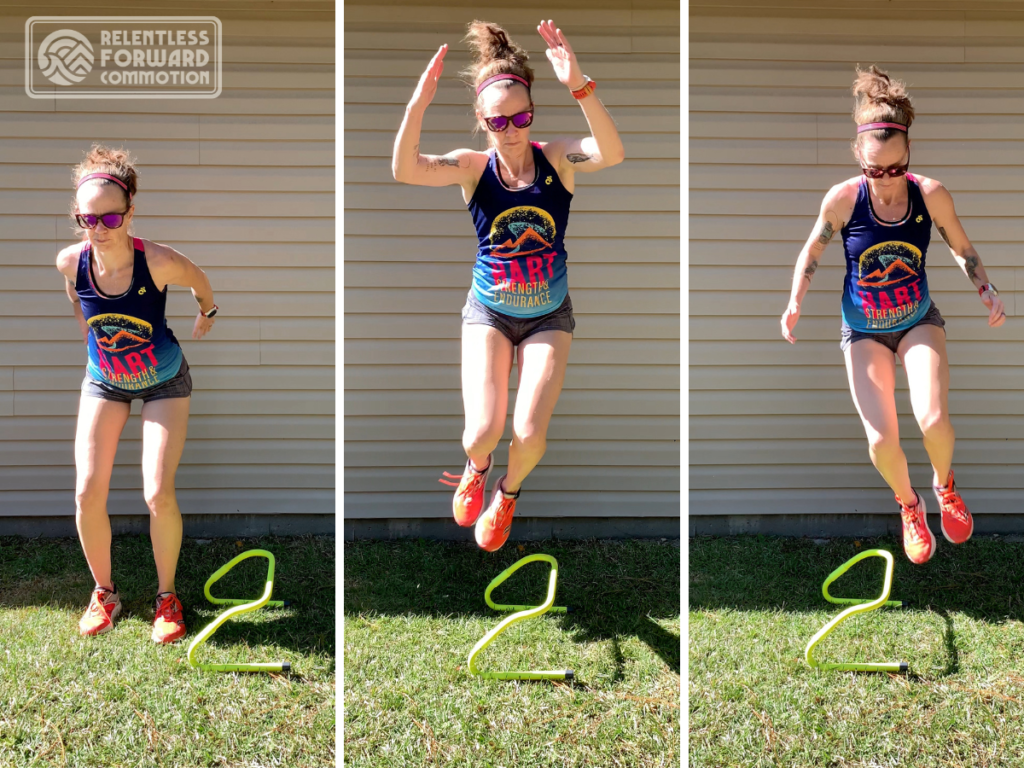
Begin with both feet on the ground, and a quarter squat countermovement. Jump up and over the barrier laterally, using both legs. Try to keep your knees and feet together (do not “skip” with one leg).
Land on the opposite side of the hurdle on both feet, and immediately repeat, jumping back to the other side.
6. Depth Push-Up
Intensity level: medium
Direction of movement: vertical
Equipment needed: weighted ball
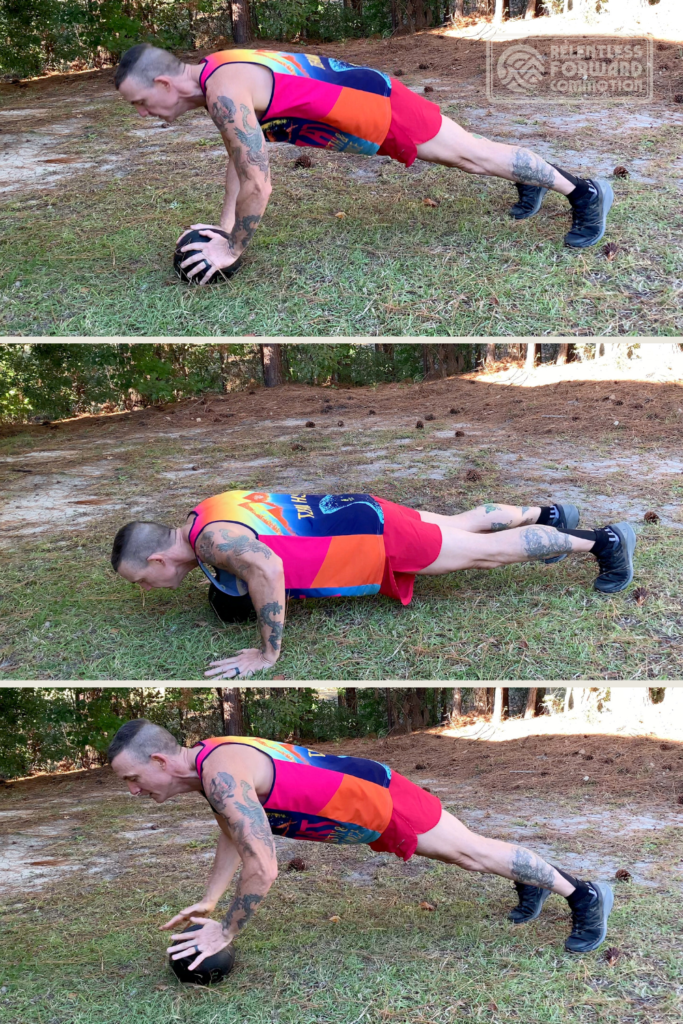
Start in pushup position with your hands on the ball, and arms extended. To begin the exercise, quickly remove your hands from the ball and let them drop to the ground. Hands should land about shoulder width apart, and arms flexed at the elbows until the chest almost hits the medicine ball.
Then, immediately and explosively push back up into the air to land with hands, palms down, on the ball in the starting position. Repeat.
7. Alternate-Leg Stair Bound
Intensity level: high
Direction of movement: vertical and horizontal
Equipment needed: closed stairs to ensure that the lead foot does not get caught.
Begin at the bottom of the steps in an upright, comfortable standing position. Start running up the steps. Once you get some momentum, start maximally extending the front leg through a knee drive, and pushing through the back leg as you bound up the stairs. You will likely skip over stairs while doing this.
Keep your toes pointed up for quick take-off and explosiveness. Avoid spending too much time on each step – as soon as you land, immediately explode onto the next one.
8. 4-Hurdle Drill
Intensity level: high
Direction of movement: lateral and vertical
Equipment needed: four hurdles
Place the hurdles in a line in the following order: hurdle one and hurdle two separated by 12 inches, hurdle two and hurdle three separated by 18 inches, hurdle three and hurdle four separated by 12 inches.
Stand on your right foot, with the line of hurdles to your left. Hold your nonjumping leg in a comfortable, stationary position.
Begin with a slight countermovement dip, then explosively jump up and left over the first hurdle, landing on your right foot. Immediately repeat the jump over the next hurdle, again landing on the right foot.
Now, immediately hop over the next TWO hurdles, using the right leg. Land on the LEFT foot. Repeat in the opposite direction using the left leg.
9. Squat Depth Jump
Intensity level: high
Direction of movement: vertical
Equipment needed: plyo box, 12-42 inches high
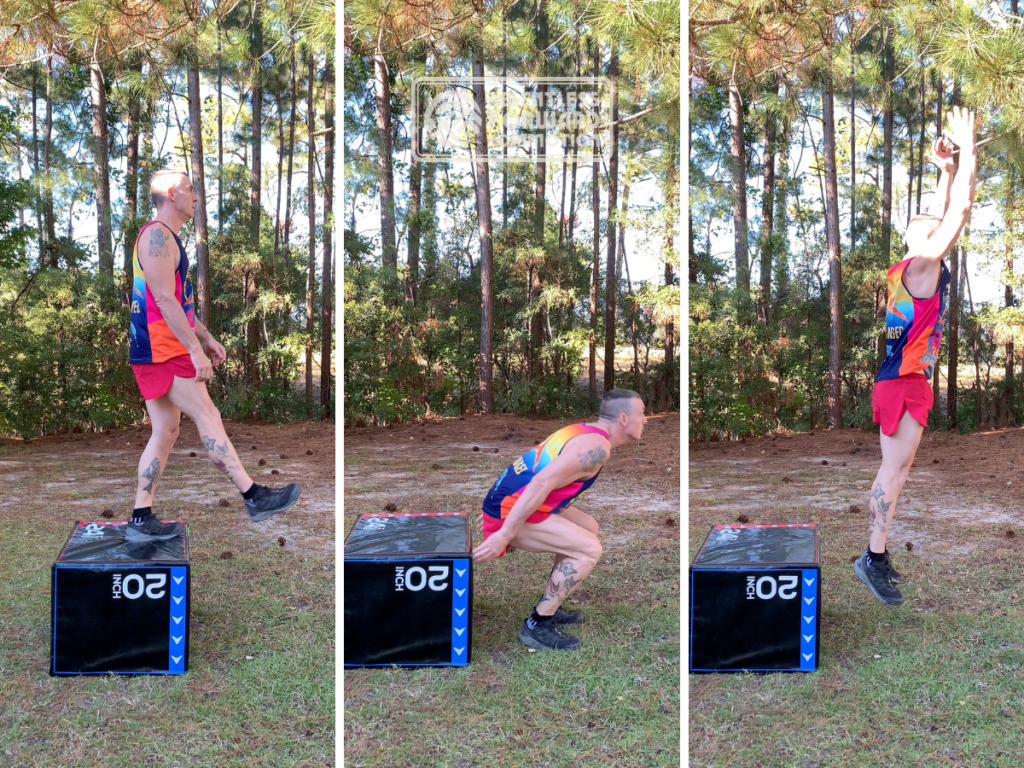
Start standing upright on top of the plyo box, toes near the edge of the box. Take a step (not a jump) off of the box. Land on the ground with both feet and quickly dip into a squat position. Immediately jump as high as possible, then land in the same squat position.
Be sure to not spend too much time in the squat position (the amortization phase) or you will lose the effects of the stretch shortening cycle.
10. Depth Jump with Lateral Movement
Intensity level: high
Direction of movement: vertical and lateral
Equipment needed: plyo box, 12-42 inches high
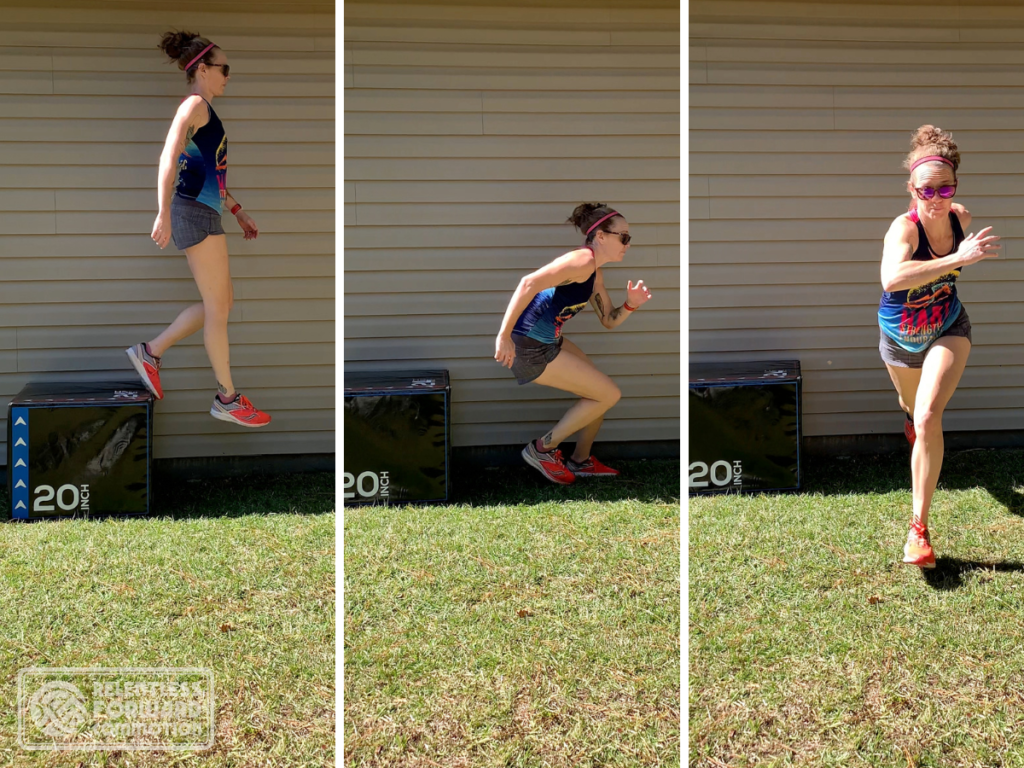
Start standing upright on top of the plyo box, toes near the edge of the box. Take a step (not a jump) off of the box. Land on the ground with both feet, then turn 90 degrees and immediately sprint for 6-8 strides.
To turn this exercise into an agility drill, have a partner standing across from the box. When you take a step off the box, have your partner randomly point right or left before you land. Upon landing, sprint in the direction that they pointed.
Plyometrics Exercises for Runners: Free Workout PDF’s
Ready to put it all together! Enter your email address in the box below and you’ll receive four different plyometrics workout PDFs, including:
- Beginner No-Equipment Plyometrics Workout
- Intermediate to Advance No-Equipment Plyometrics Workout
- Beginner Equipment-Based Plyometrics Workout
- Intermediate to Advance Equipment-Based Plyometrics Workout
Questions? Please leave them in the comments section below!
Resources:
- C. Chambers, T. D. Noakes, E. V. Lambert & M. I. Lambert (1998) Time course of recovery of vertical jump height and heart rate versus running speed after a 90-km foot race, Journal of Sports Sciences, 16:7, 645-651, DOI: 10.1080/026404198366452
- Gómez-Molina, J., Ogueta-Alday, A., Camara, J., Stickley, C., & García-López, J. (2018). Effect of 8 weeks of concurrent plyometric and running training on spatiotemporal and physiological variables of novice runners. European journal of sport science, 18(2), 162–169. https://doi.org/10.1080/17461391.2017.1404133
- Haff, G.G., & Triplett, T.N (2016). Essentials of Strength and Conditioning (4th ed.). Human Kinetics.
- Lum, Danny & Tan, Frankie & Pang, Joel & Barbosa, Tiago. (2019). Effects of intermittent sprint and plyometric training on endurance running performance. Journal of Sport and Health Science. 8. 471-477. 10.1016/j.jshs.2016.08.005.
- Lundstrom, Christopher & Betker, Morgan & Ingraham, Stacy. (2017). Effects of Plyometric and Explosive Speed Training on Recreational Marathoners. Journal of Sports Science. 5. 10.17265/2332-7839/2017.01.001.
- POSITION STATEMENT: Explosive/Plyometric Exercises. National Strength and Conditioning Association Journal: June 1993 – Volume 15 – Issue 3 – p 16-16
- Ramírez-Campillo, R., Alvarez, C., Henríquez-Olguín, C., Baez, E. B., Martínez, C., Andrade, D. C., & Izquierdo, M. (2014). Effects of plyometric training on endurance and explosive strength performance in competitive middle- and long-distance runners. Journal of strength and conditioning research, 28(1), 97–104. https://doi.org/10.1519/JSC.0b013e3182a1f44c
Heather Hart is an ACSM certified Exercise Physiologist, NSCA Certified Strength and Conditioning Specialist (CSCS), UESCA certified Ultrarunning Coach, RRCA certified Running Coach, co-founder of Hart Strength and Endurance Coaching, and creator of this site, Relentless Forward Commotion. She is a mom of two teen boys, and has been running and racing distances of 5K to 100+ miles for over a decade. Heather has been writing and encouraging others to find a love for fitness and movement since 2009.

R. Baril
“I’m a shooting star!” – love your Hartford high varsity soccer team
Heather
<3 <3 <3 <3 you just made my month <3 <3 <3 <3
Kimberly Hatting
Ironically, I also posted a plyo workout today in the link-up 😉 I do a lot of the above ones for dynamic warm-ups before a run. They really wake up the body!
Hugh Headley
Needing gym membership was putting me off strength training. This is exactly what I needed.